Iris Investigate User Guide

Iris Investigate combines enterprise-grade domain intelligence and risk scoring with industry-leading passive DNS data.
Access Iris Investigate at iris.domaintools.com/investigate/
Get Started
Access
Access is provisioned in your DomainTools Enterprise account. Contact enterprisesupport@domaintools.com for help.
APIs
The Iris Investigate API and the DomainTools API suite are documented in our OpenAPI specifications on SwaggerHub, and in our API documentation.
Begin Your Investigation
When you begin a search, Iris Investigate automatically starts your investigation.
Investigations are containers that organize a collection of search queries and results, search trails, data pivots, notes, and more. The Collaborate section explains how to share and export investigations.
Searching
Perform your first search from the DomainTools Research page, the Iris Investigate landing page (pictured below), or from within the app.
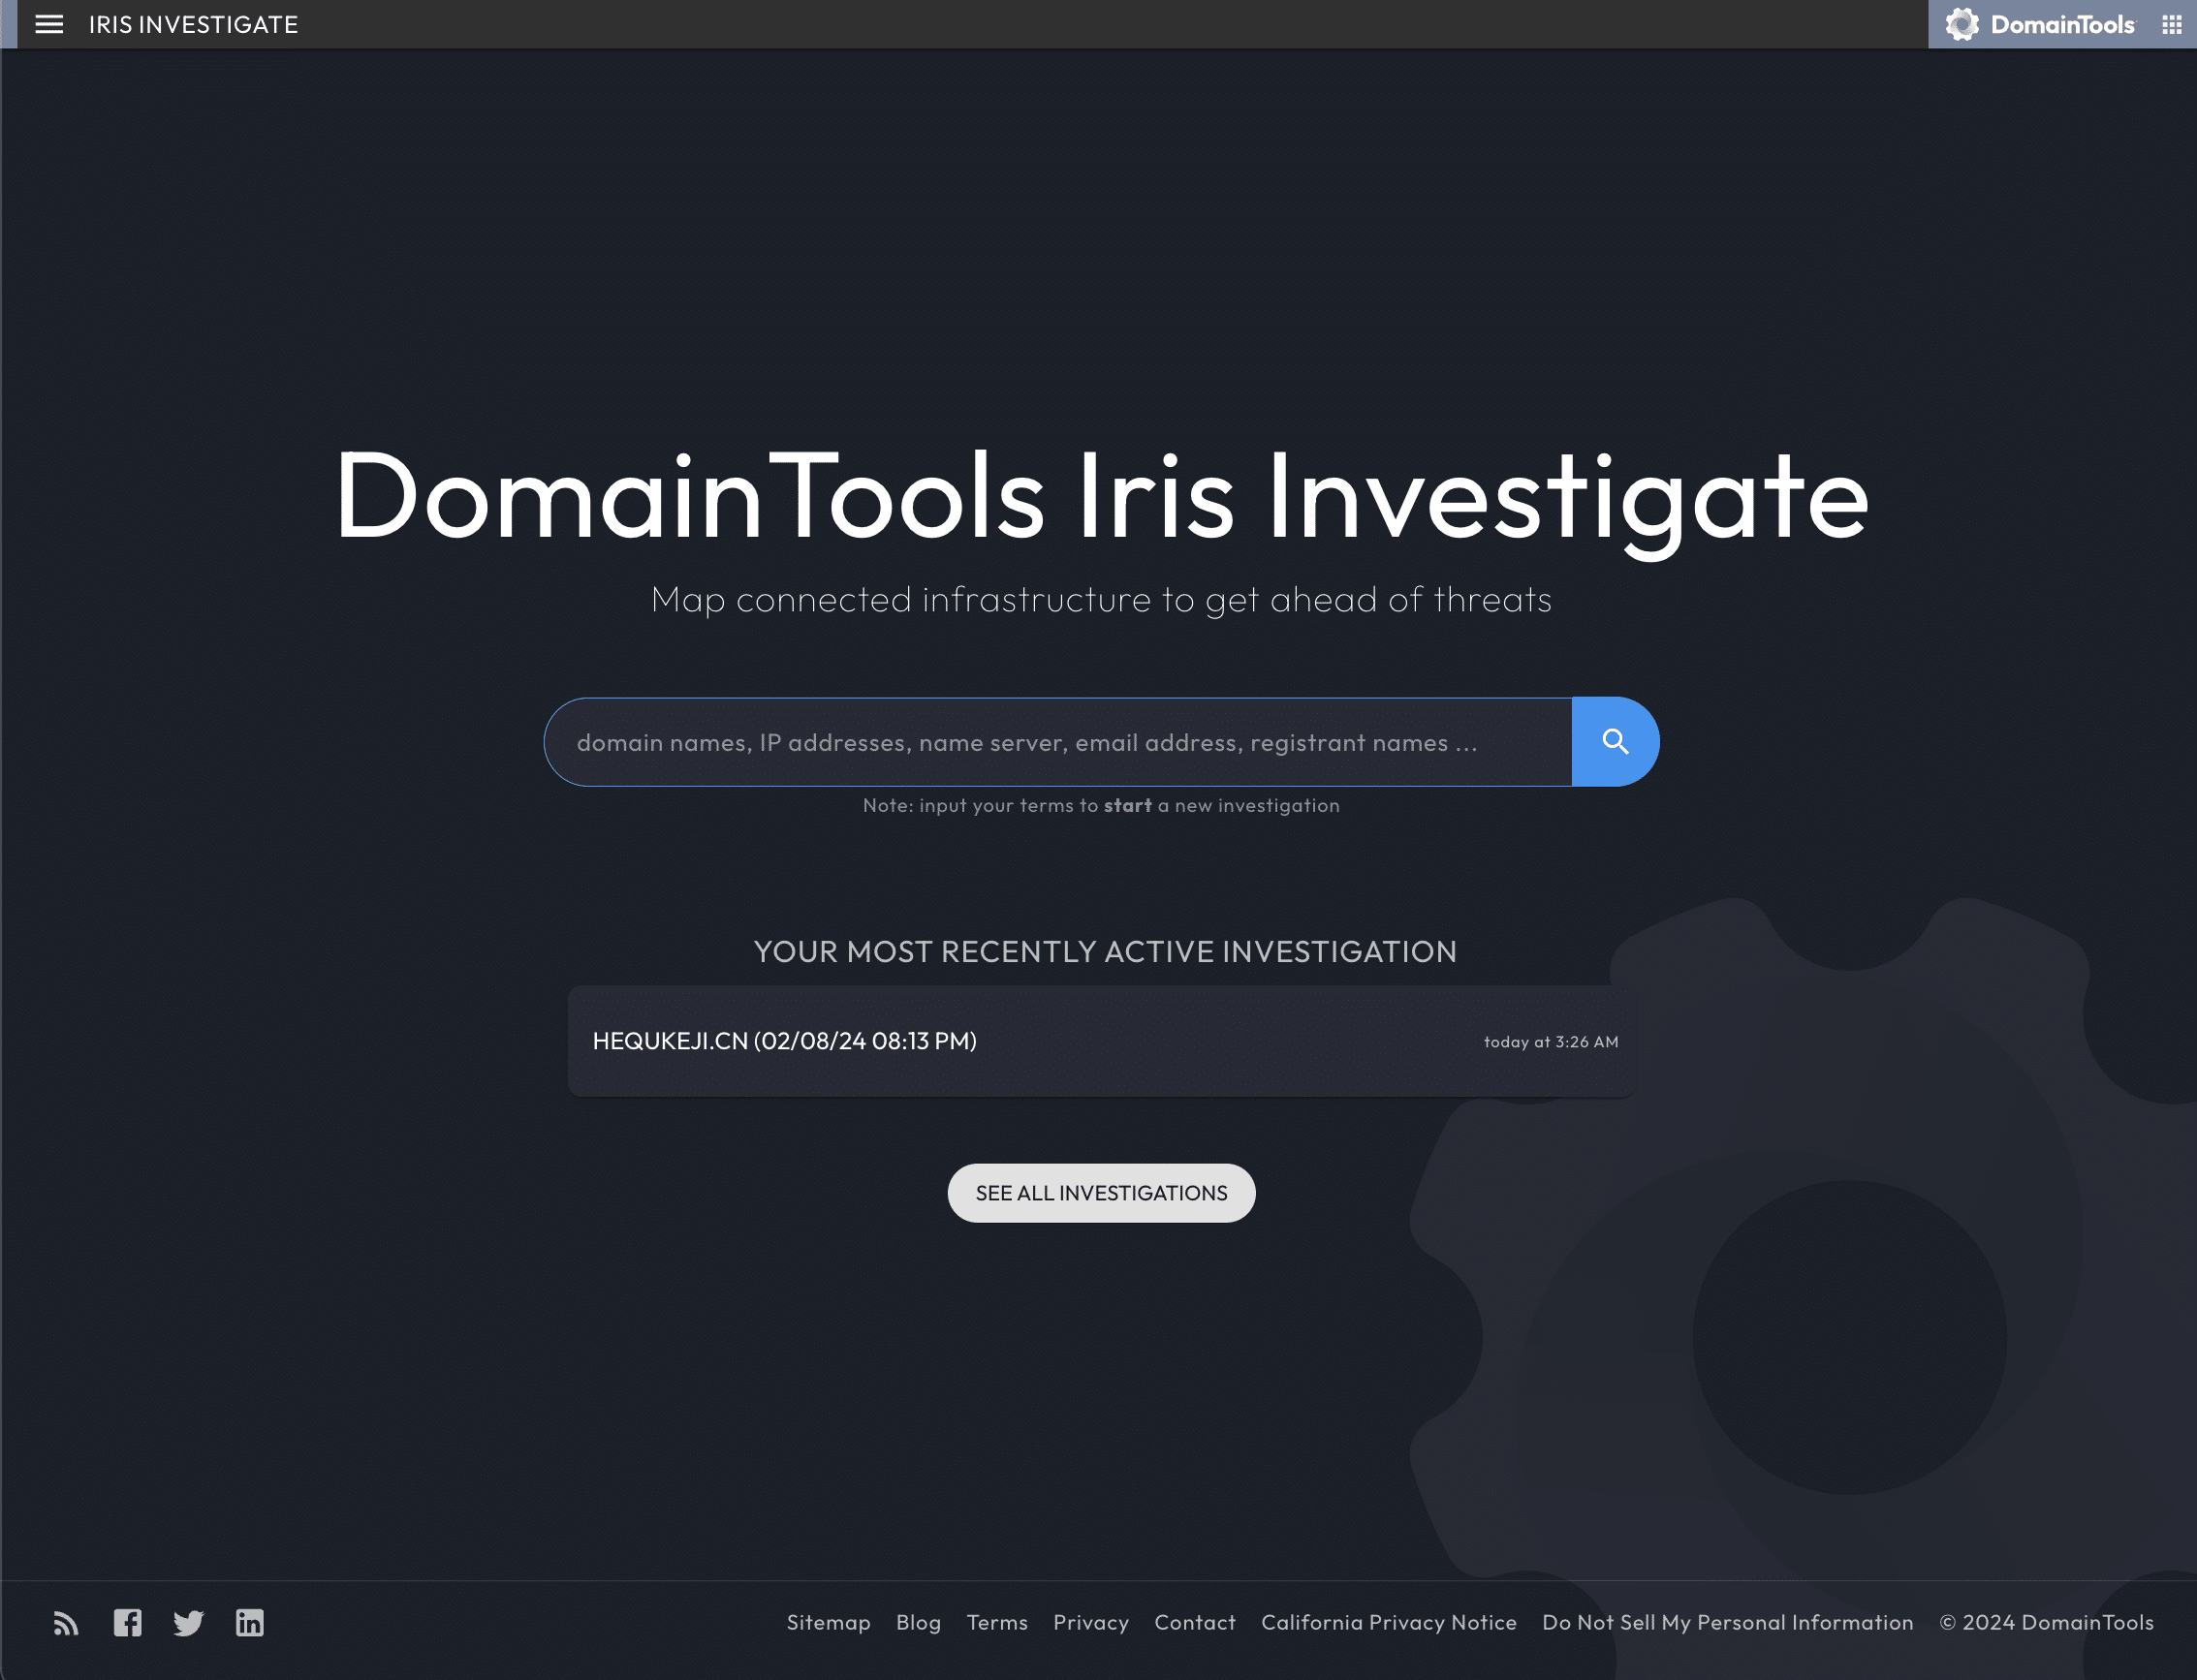
Begin searches with any of the accepted search parameters, and Iris Investigate will guess which type of data you provided: for example, it will interpret 4.2.2.2 as an IP address and domaintools.com as a domain name. (Iris Investigate also accepts ‘de-fanged’ domain names, such as example[.]tld.) Include shortcodes in your query string to specify the data type, and pass these codes from non-DomainTools applications in the API.
Viewing Results in the Web Interface
Your search will bring you to the Iris Investigate web interface, the interface you will start at if you have made a recent search or if you are continuing an investigation. Start interacting with your search results with three major components of the Iris Investigate web interface:
- The Search Area, including a navigable 'breadcrumb' investigation graph.
- The Panel Navigation, Tabs, and Selector, for navigating and re-ordering Data Panels.
- The Results Panel, which begins with the Pivot Engine in the leftmost spot.
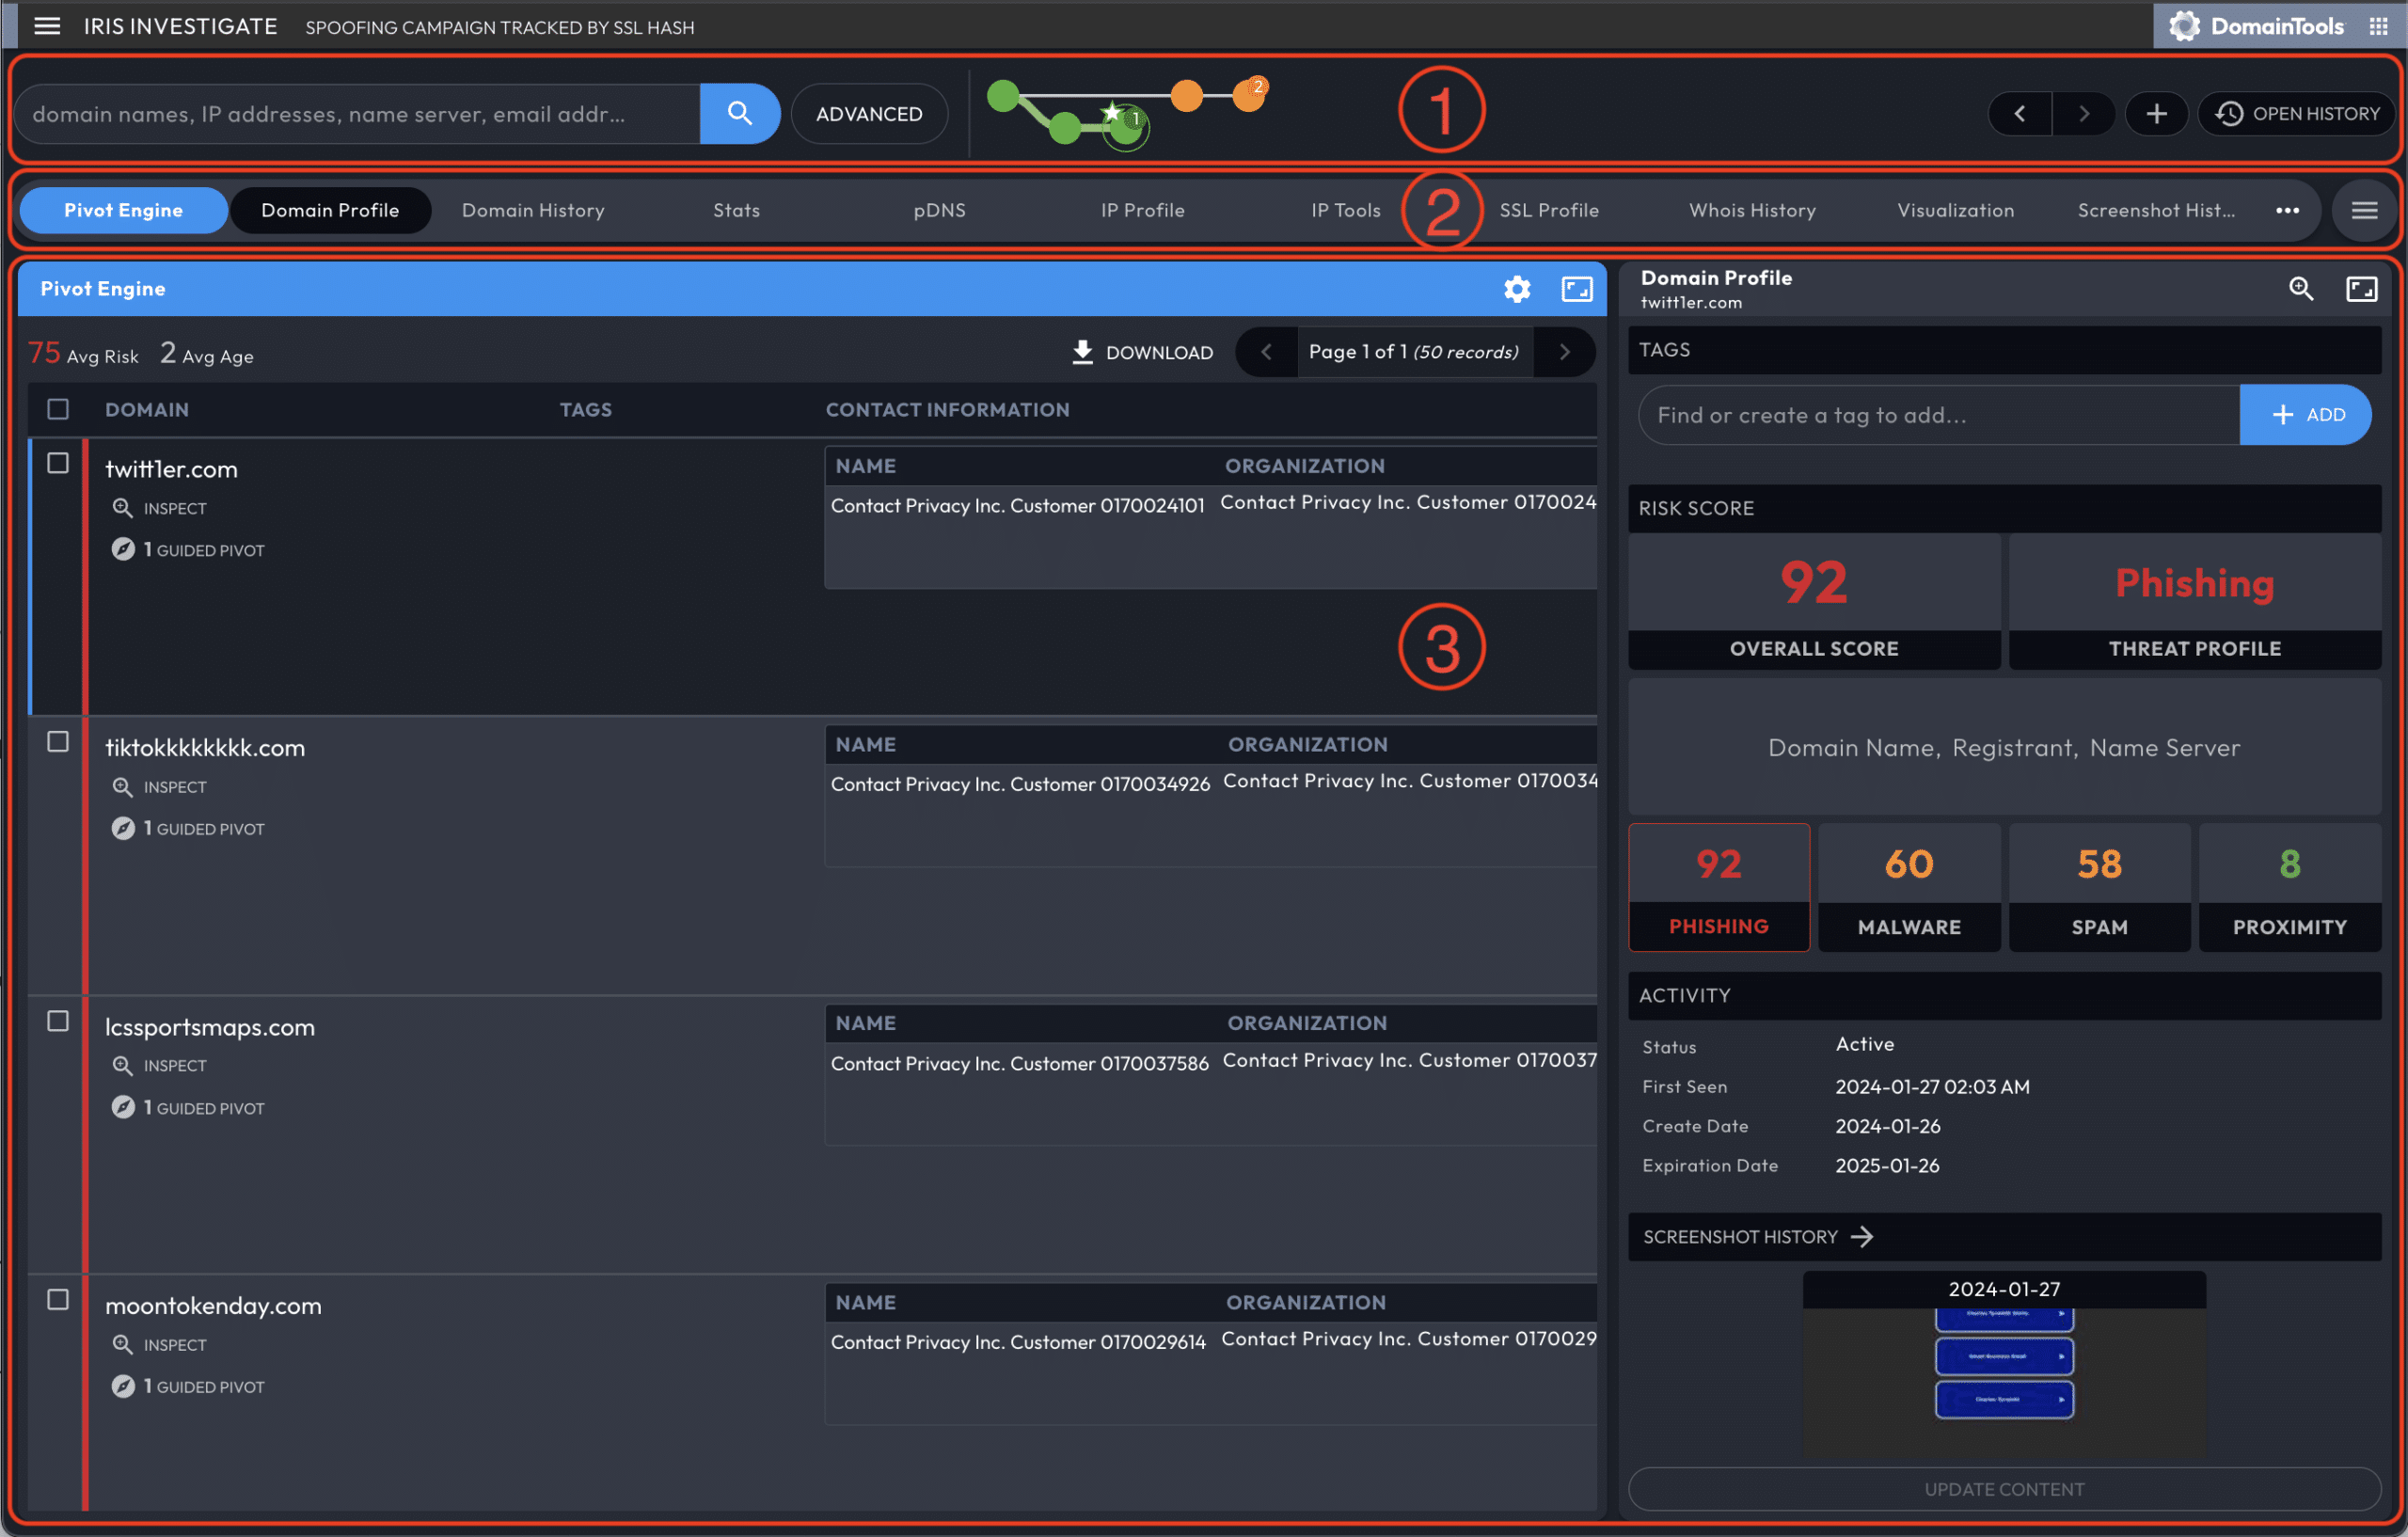
Review the results of your search query in the Pivot Engine panel:
- If Iris provides a single domain for your search, it populates the Data Panels with information for that domain.
- If your search query returns multiple domains, Iris lists multiple entries in the Pivot Engine, and populates the remaining Data Panels with the domain you select.
The Data Panels remain populated with the selected domain's information while you create new branches, or perform searches with no results. This means that the active domain will remain populated in the Data Panels until you select a different domain.
Advanced Search Filters
Filter or expand your results through the Advanced button next to the search box. Add additional filters with logical AND (narrow results) and OR (expand results) operators. Each filter can use a match rule available for its specific data type (see the Search Parameters section in the Reference, below).
Drag/drop values from the Pivot Engine into the (opened) Advanced Search pane to quickly build an advanced search based on values in the Pivot Engine
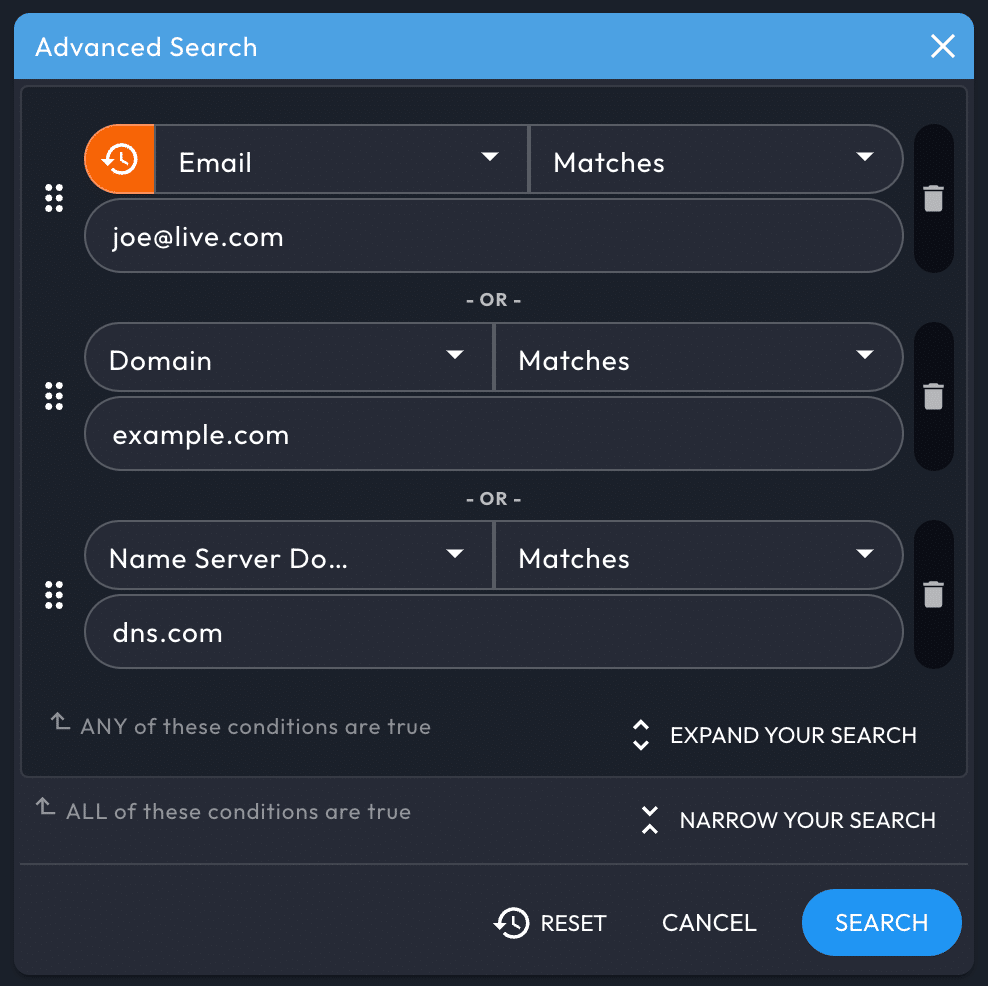
Iris Investigate supports a maximum of 1024 filters per advanced search.
Pivoting on Search Results
The concept of a “pivot” is fundamental to many investigations—that is, given a starting point, discover connections to one or more related items. For example, if your starting point is a domain lookup, a common pivot is on the email address of the registrant of the domain. This pivot shows all of the other domains in the DomainTools database that are connected to that email address. Many datapoints serve as pivots—IP addresses, registrant names, name servers, etc. Most data types shown in Iris Investigate can function as pivot points.
Execute advanced searches directly from your search results by pivoting on specific data points. Pivots advance your investigation by modifying your search with data you select from your search results.
In addition to listing your search results, the Pivot Engine aggregates search results, displaying key data points which can be pivoted on or explored further in the relevant associated data panel.
Right-clicking on a data point brings up the Operations Menu, which pivots on or (with many data types) further inspects the data.
Pivoting with the Operations Menu
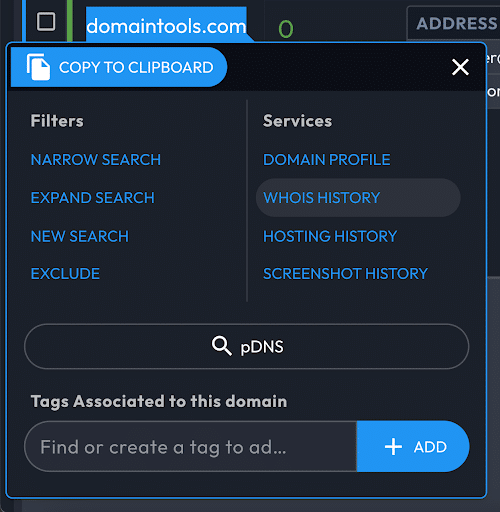
By right-clicking a data point, the Operations Menu lets you narrow or expand your search with the data point's string, start a new search, or exclude results containing that string. These operations mirror what is available in the advanced search panel. For example, “Expand Search” will use your new search term to create an “OR” search with your previous query. trigger an “OR” search with your original and means that the new search will be a logical AND of your original query and additional queries
Previewing and Inspecting Results with the Operations Menu
In addition to the filter controls for pivots, the Operations Menu offers preview and inspection information, depending on the type of data you select.
When you select a domain, the Operations Menu links to domain-specific information across multiple Data Panels.
When you select a non-domain field (e.g. IP address, contact information), the Operations Menu will display
- The number of domains that share that value.
- The option to list and further investigate those domains from a side panel (for guided pivots).
- A link to investigate the data point in the pDNS panel
- The Domain Risk Score.
The Operations Menu will also display information specific to the type of field selected. For example, if you right click an IP it shows IP Profile, Ping, Traceroute, and PTR. A SSL fields give the option to go to it's SSL Profile.
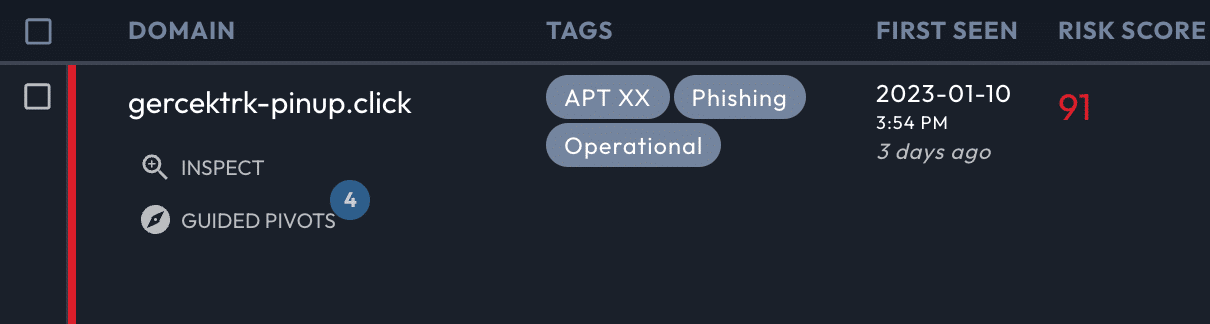
Guided Pivots
Iris Investigate highlights any field that can pivot to 500 or fewer domains, a range that typically indicates a useful investigation target. Often, the smaller the number of pivots, the more useful the connection to another domain may be. For each of the Guided Pivots, the average risk of the associated domains is shown as a quick indicator of severity.
Configure the threshold or disabled Guided Pivots in settings, accessible from the Product Menu or the settings icon on the top left of the Pivot Engine.
Domain Risk Score
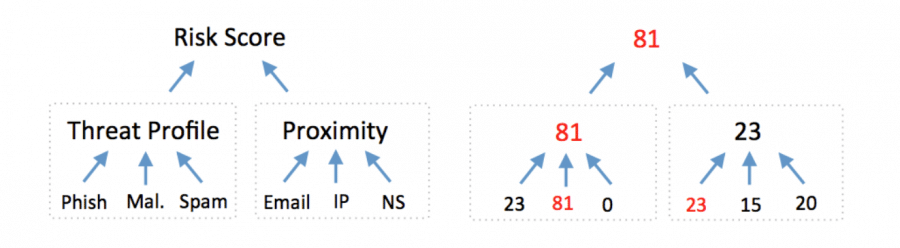
The Domain Risk Score predicts how likely a domain is to be malicious, often before it is weaponized. Read more about the Domain Risk Score in the Technical Brief. The score comes from the strongest scoring of two distinct algorithms: Proximity and Threat Profile.
Proximity evaluates the likelihood a domain may be part of an attack by analyzing how closely connected it is to other known-bad domains. Threat Profile leverages machine learning to model how closely a domain’s intrinsic properties resemble others used for spam, phishing, or malware. The highest score from either spam, phishing, or malware becomes the Threat Profile score.
Navigating with Search History
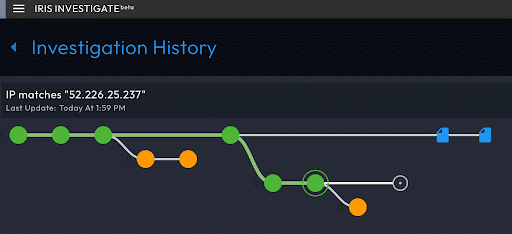
Each time you pivot on your results, Iris Investigate moves your investigation forward to a new node in your Search History. Each new node connects to its originating node with a line/edge. Toggle fullscreen mode with h. (For a complete list of Iris Investigate UI keyboard shortcuts, consult the Technical Reference.)
The search history graph is coded with details about each search node. For example, green nodes indicate your active investigation path, orange nodes indicates searches outside of your active investigation path, and blue 'document' icon nodes indicate passive DNS results. Consult the Technical Reference for all Search History indicators.
Return to any point in your investigation by selecting the node, and Iris Investigate will load your Pivot Engine and Data Panels for that query. Continue with new pivots, and Iris will create a new branch of nodes.
Create a new, empty history branch by selecting the + button near the top right corner of the Pivot Engine. Your next query will be the root node of the new branch (note how this feature can aid in organizing your investigation). Start a new branch with the current node as the root. To do this, select Manage History > New History Branch > Start it with the Current Search.
Once you delete a node or a branch, it cannot be recovered.
Annotating in Search History with the Search Node Drawer
Hovering over a search node invokes the search node drawer, which can:
- Highlight nodes with the
Mark as Importantbutton. - Export this node's search hash to the clipboard.
- Review and add Search Notes.
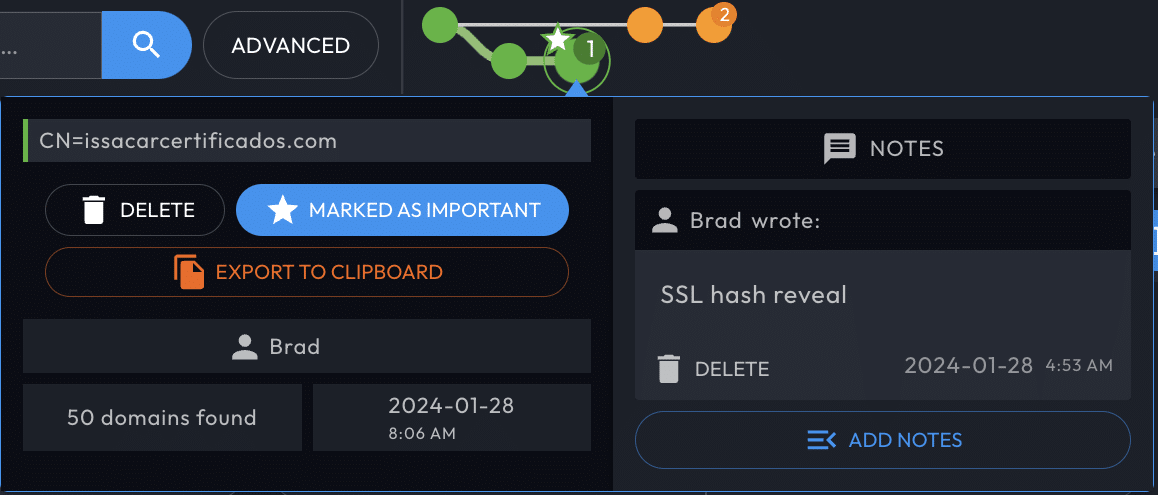
When notes exist for a node, a number on the node indicates how many notes it has. The search nodes in your investigation history also indicate (with a number bubble) the Search Notes count, as well as the nodes Marked as Important.
Enter an IP address, domain name, or email address in your notes, and Iris Investigate enables Operations Menus to search or filter directly from the notes.
The Product Menu
Create or open investigations, start an ad-hoc search, adjust the layout, or return to the home page from the navigation column. Click “Iris Investigate” in the upper left corner to open it.
The Product Menu contains the Settings menu.
Tagging Domains
Tags attach to domains, include an editable description field, and can be modified with the Iris by the Iris APIs. Edit, search, and filter by tag. The Tag Manager displays all the domains associated with a single tag, across your group.
Tags can be applied to these and other use cases:
- Attribution labeling
- Threat profile type
- Operational status
- Inclusion in a specific case
- Triage or other status
- Programmatic decision-making
In addition to the API, access tags through the following sections of the Iris Investigate UI:
- The Pivot Engine lets you modify tags from one or multiple domains by selecting the domains and the
Tagbutton (you can also export tags). - The Operations Menu, when opened from a domain, allows you to edit tags for that domain.
- The Tag Manager (accessible from the Product Menu) displays all tags from your investigations. It also includes tags used in your group: consult the Collaborating section, below.
- The Stats Data Panel visualizes tags.
Sharing Tags and Tagged Results
Your tags are automatically shared with other users in your group. Your investigations are private by default, but can also be shared to your group.
If you export a Search Hash to a user outside of your group, your tags will not be visible.
Collaborate
Groups
A Group consists of the other Iris Investigate users at your company.
Search Hashes
Search Hashes will share a specific search to anyone with Iris Investigate, including people outside of your group. Search hashes reproduce search terms, but do not include tags or other investigation-specific information. Search hashes can also be used by the Investigate API to query for the results of an advanced search first created through the Investigate web interface.
Sharing Investigations
By default, investigations are private to the originating user.
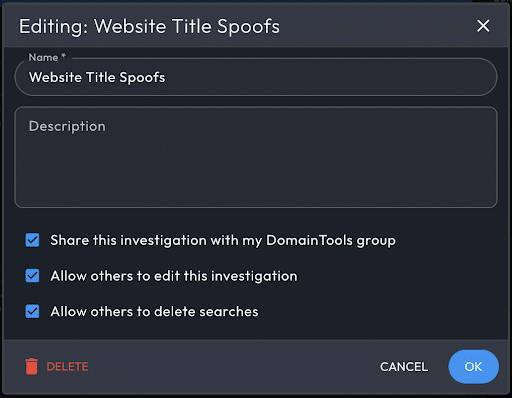
Share your investigations from the Product Menu by hovering over your active investigation, and then selecting Edit Investigation. Three access levels are available for your group members: view, add branches, and delete branches.
When another user creates a new search node in your shared investigation, that node will appear in Search History with a sharing icon, and trigger a browser notification.
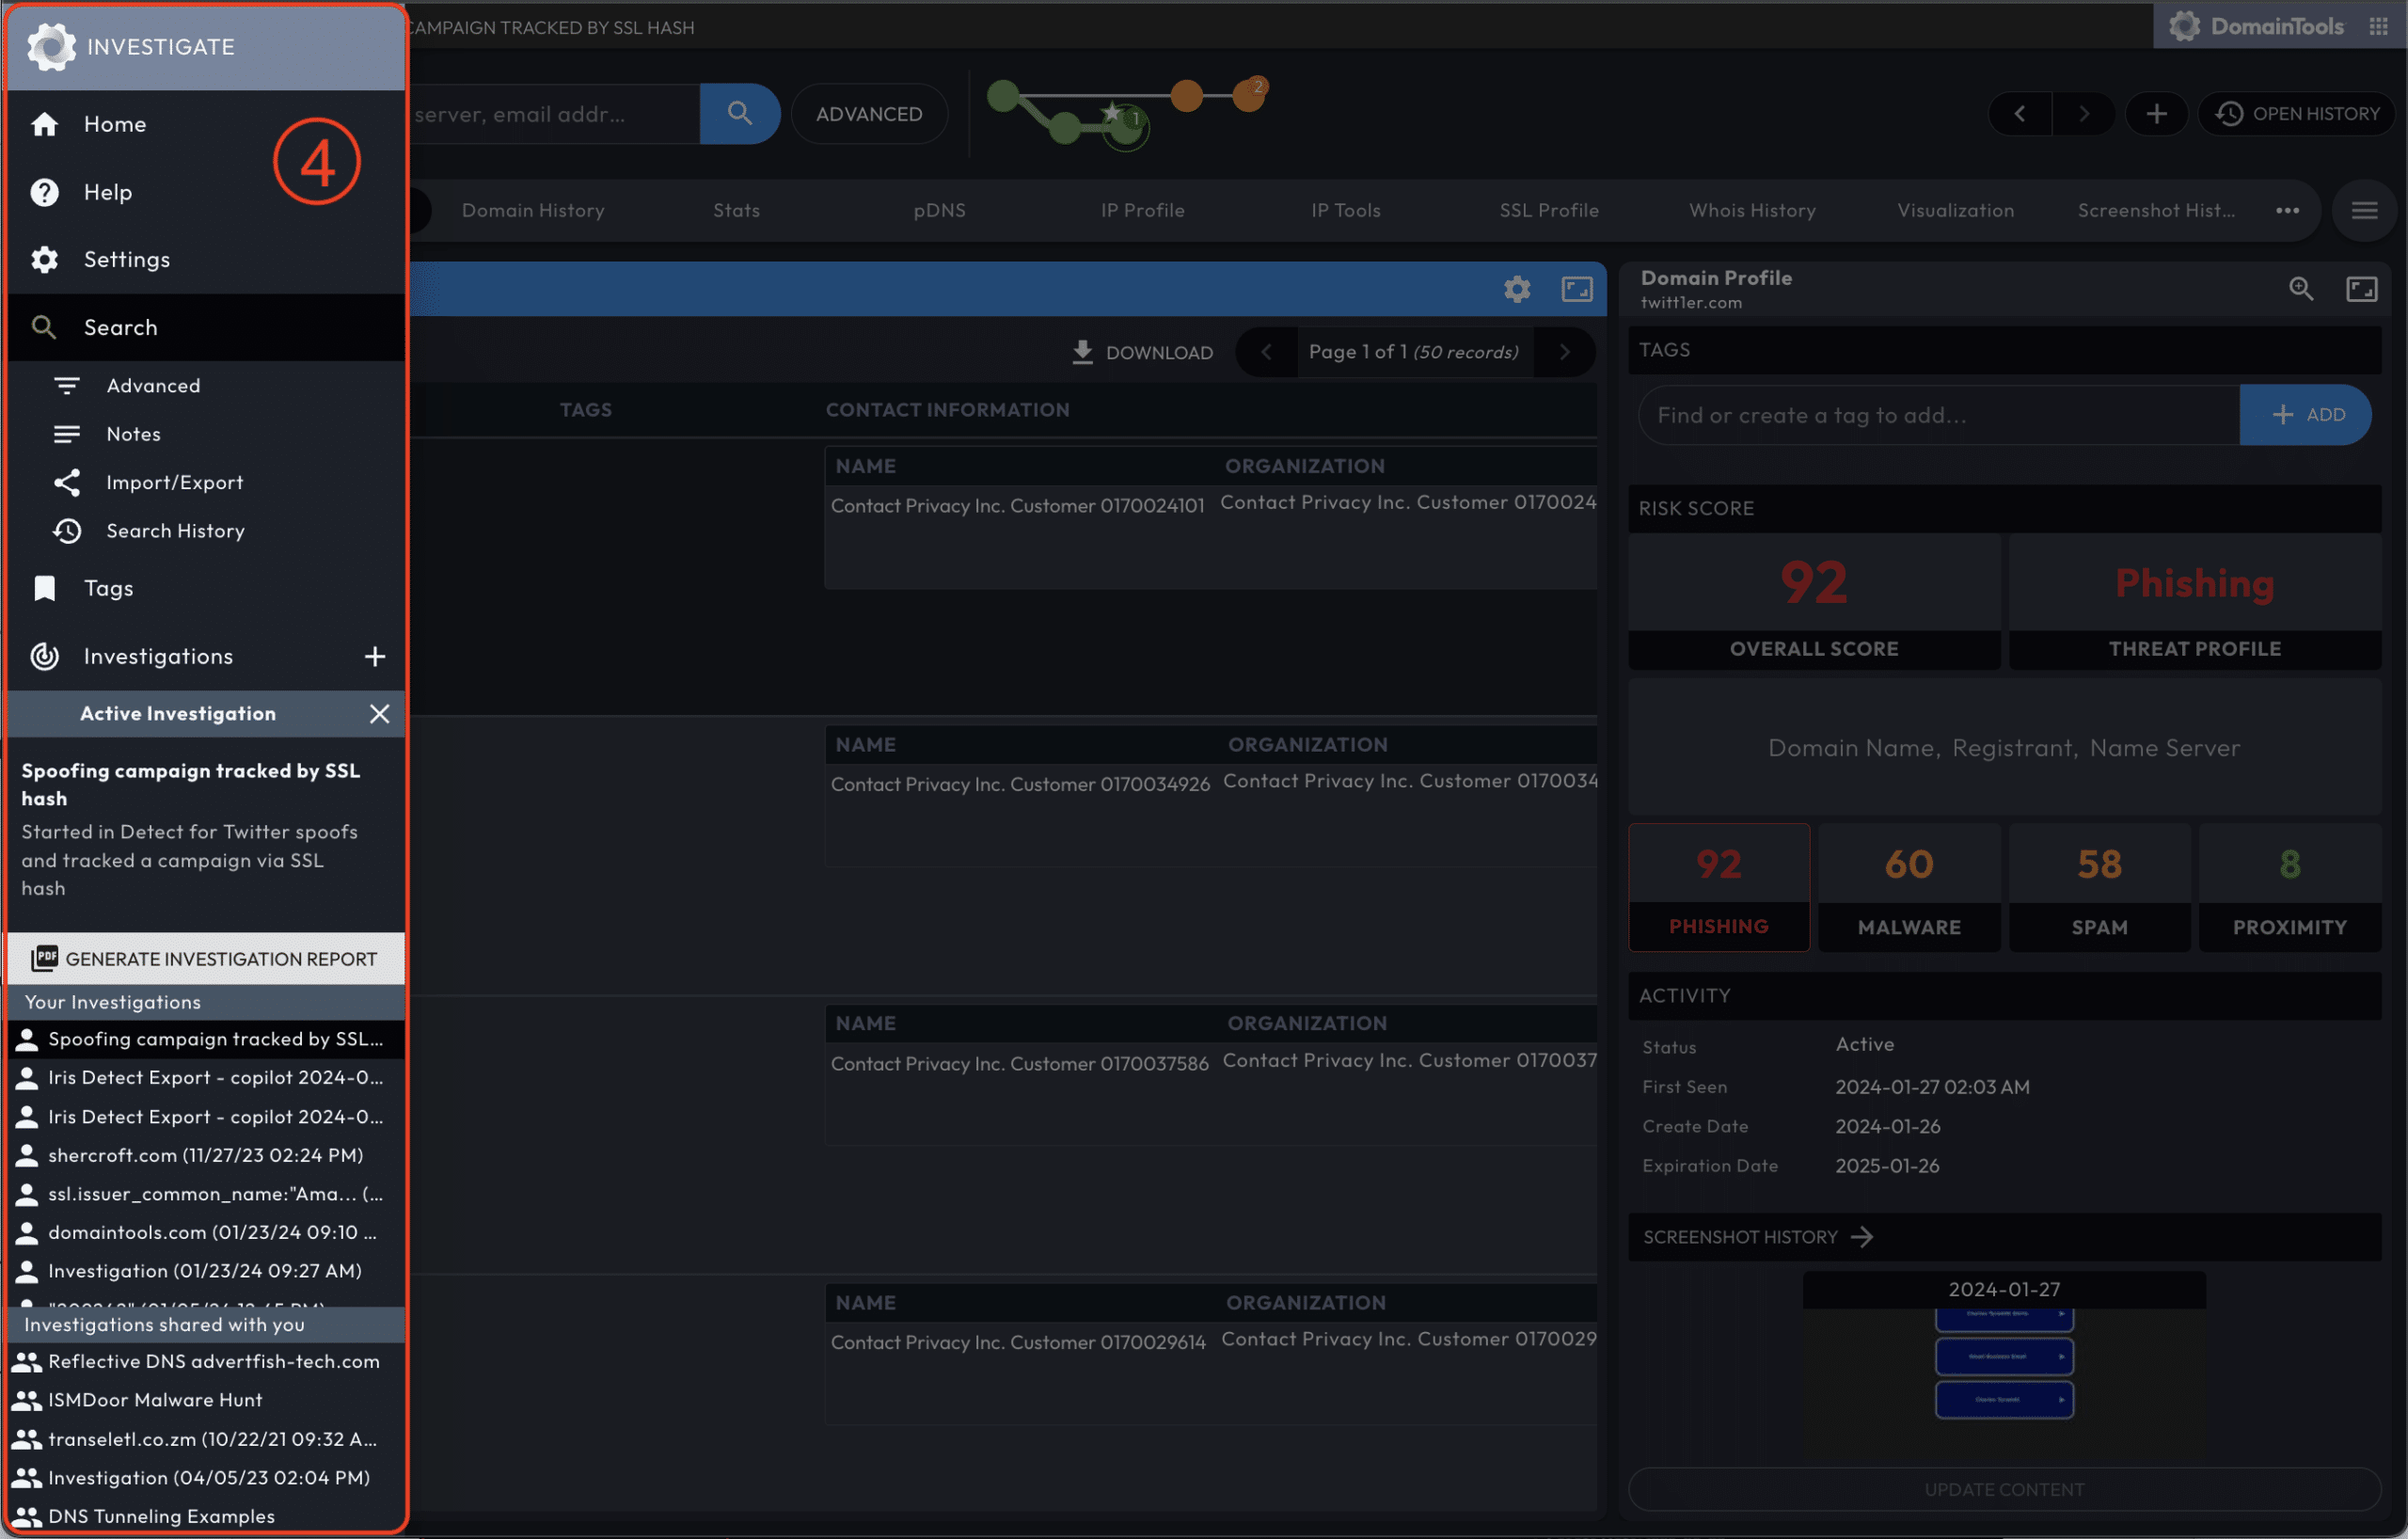
When an investigation is shared with you, the investigation will appear in your investigation list in the Product Menu, grouped under the heading Investigations share with you.
If you unshare an investigation, the investigation disappears for other group members.
Reporting
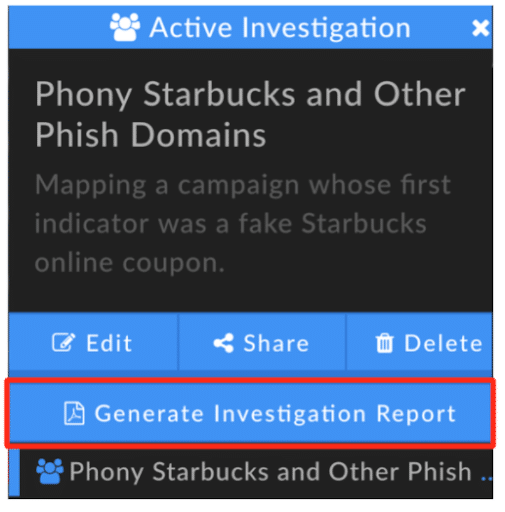
The Generate Investigation Report button in the Product Menu creates a PDF containing the following information:
- Title and description.
- Investigation path in tabular form, and including search notes.
- Pivot Engine data in tabular form, with columns matching your Pivot Engine Panel columns. For search results numbering over 500, the report will include the page of Pivot Engine results that are displayed at the time of generation.
- Statistics, via the Stats Data Panel.
- Visualizations, generated from the current appearance of the Visualization Data Panel (large result sets may not display well in this format; download high-res images from the Visualization Data Panel directly).
Reports are generated from the viewpoint of the current selected node in your investigation. For a report of the full investigation, select the final node before generating the report. The Stats, Visualization, and Pivot Engine Data Panels must be displayed in the investigation UI in order for their contents to be included in the report.
Export Pivot Engine Results
Export your full Pivot Engine table at any time by selecting the DOWNLOAD button next to page navigation near the top of the Pivot Engine Data Panel, and selecting the format (CSV, STIX 1.2, or STIX 2.0).
Fields containing multiple values have repeated columns in order to maintain a single value per table element.
Use Data Panels
Iris Investigate uses Data Panels to present domain information in containers.
Navigate Data Panels with the Data Panel Tabs, and select which Data Panels are visible through the 'hamburger' menu on the far right of the ribbon.
Data Panels can be resized with the 'resize' icon on the far right of the Data Panel's title ribbon. Most panels have settings options, accessible through the settings icon in the panel's title bar.
Context-appropriate Data Panels can be invoked from the Operations Menu and Pivot Engine, as well as from within Data Panels.
Domain Profile Data Panel
The Domain Profile Data Panel serves as a snapshot of all domain related data in one data panel. It is especially useful for getting an overview of the domain-related data, and choosing the next data panel to review for your investigation.
The Domain Profile panel shows the following information:
- Domain name
- Domain Risk Score
- Screenshot
- Recent Passive DNS resolutions
- Dates: First Seen date/time, Whois Create Date, Expiration Date
- Email address(es)
- Registrant Organization
- Registrar
- Registrar Status
- Name Servers
- IP addresses
- IP location
- ASN
- Whois History summary
- Website title and server type
- “Raw” Whois record

Domain History Data Panel
Domain History shows how a domain has evolved over time. It replaces the legacy Hosting History service, covering many more fields and covering all domains tracked by DomainTools.
The tracked data elements include:
Data elementDescriptionStatusWhen a domain is seen as newly active by DomainTools, or when a domain becomes inactiveWhois dataCreate/expiration dates, registrar and registrant names, contact emails, and moreDNS dataResults of daily DNS resolutions for A, NS, MX and SOA active resolutionsWeb contentWebsite title, response code, server type, trackers, and moreScreenshotsThe date/time when a new screenshot is capturedSSL Certificate updatesThe SHA 1 hash, validity dates, Issuer Common Name, and up to the first 5 Subject Alt Names
Each data element is tracked for differential changes, and records are generated when a value in a tracked field changes. The newly added element is shaded green and also has a short vertical bar. Unchanged elements have no special formatting.
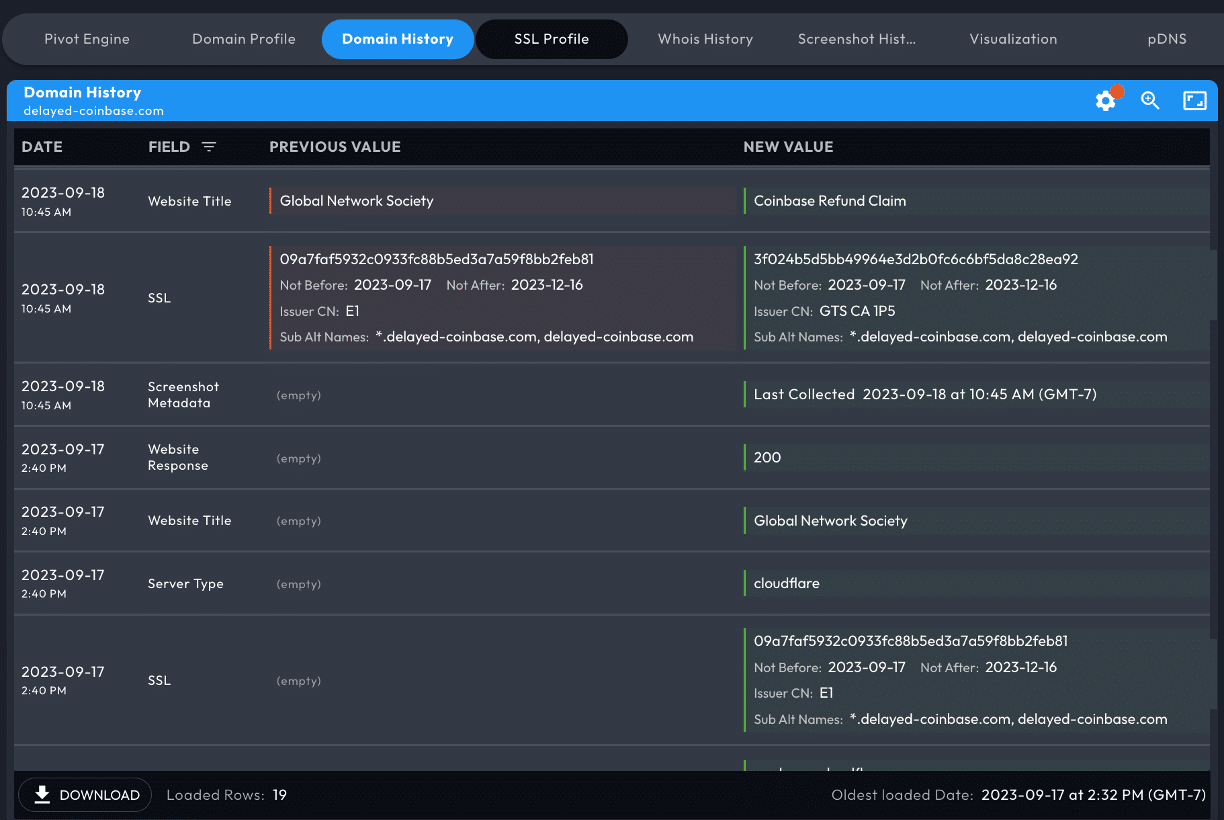
The above example shows that new website title and certificate data was collected, increasing the domain's risk.
Filter the list by primary and secondary categories in the Domain History: Fields Settings menu, accessible through the gear icon on the left of the Domain History panel title bar. Show and hide the new subset of your results by toggling in the Field button, located in the panel's column rows.
Screenshot History Data Panel
The Screenshot History data panel provides an index of dates for which DomainTools has an archived screenshot for the domain. If Screenshot History is empty, queue the domain for a screenshot, which will typically be available within 24 hours (often much sooner).
When multiple historical screenshots are available, browse through them using < or >.
Stats Data Panel
The Stats Data Panel shows the number of occurrences of datapoints within the displayed results set, and can help you understand the level of connection of the domains in your pivot engine. In some cases, such as date fields and risk score, domains in the result set are grouped in sets, rather than by individual values.
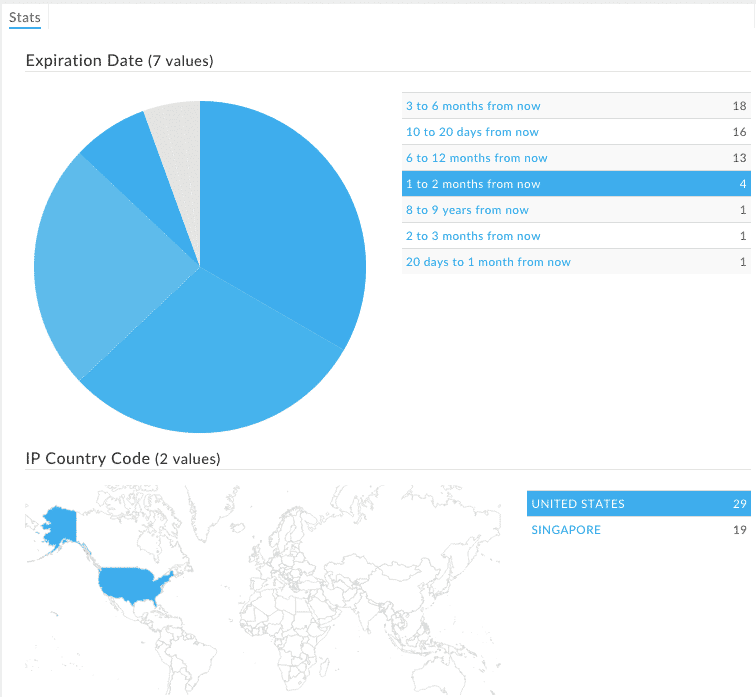
Each of the data types is represented graphically (a map for IP country and pie charts for all others), organized in a table.
In the settings menu within the Stats Panel, under Sorting, you can choose to have guided pivots ordered first.
Stats aggregates data for the first 2,500 records in the results set.
Visualization Data Panel
The Visualization Data Panel is a visual representation of connections between domains in the Pivot Engine. It depicts domains as blue nodes; the color-coding for the others can be seen in the legend in the upper left. A domain can either be a larger or normal sized dot. The larger dots represent domains with high risk scores of 70 or higher. The legend also shows how many instances there are for each field in the graph. Select Edit Fields to choose up to 4 fields (plus domain) to view.
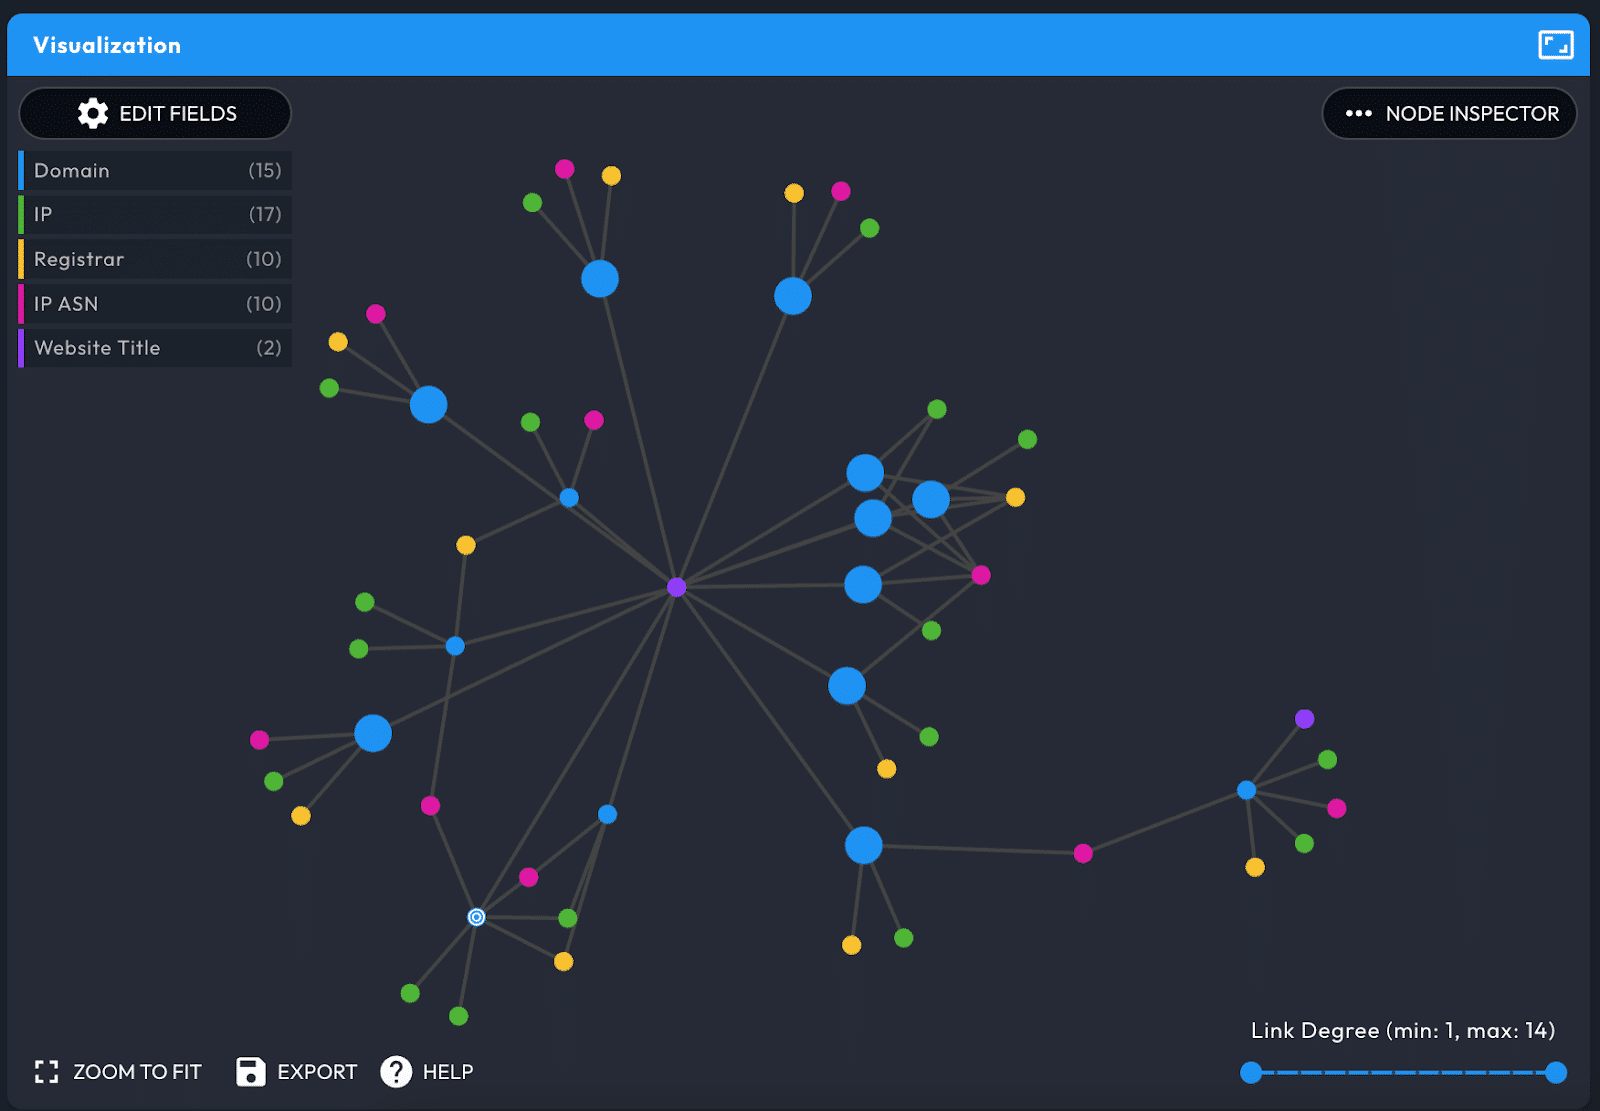
Double-clicking a domain or IP address node makes it the current domain and populates all domain-centric panels. When you hover over a node on the graph, that node and those directly connected to it are highlighted. Zoom in and out on the graph, and drag an item in the Force layout in order to put the most interesting data in the center.
The Link Degree slider in the lower-right lets you filter out data that either have too many or too few connections.
Node Inspector
Use the Node Inspector on the right of the panel to view the values for each of the fields. It is possible to search for a specific value or filter by field, and perform guided pivots.
This is a great way to see a list of all the different values used by the domains in the pivot engine for a specific field (data point).
Passive DNS (pDNS) Data Panel
Passive DNS (pDNS) shows current and past domain to IP resolutions, as well as date stamps bracketing and relative dates, for when a given resolution was observed.
Query pDNS data from a search, or as a pivot with the Operations Menu. It supports searching by
The pDNS data in Iris Investigate include the following record types:
Record typeDescriptionAIPv4 resolutions for domains and subdomains/hostnames (by default, the pDNS panel shows A records only)AAAAIPv6 resolutions for domains and subdomainsNSName serverSOAStart Of Authority email addresses and name serversMXMail server host names and IP addressesCNAMEAlias records mapping one hostname to anotherTXTOptional catch-all record that may contain arbitrary descriptive information
Query vs Response
pDNS data is available from the query and response 'directions'.
- The
querydirection, also known asrrname, shows historical results for when the domain was queried and IP addresses were returned. - The
responsedirection, also known asrdata, shows historical results for when the IP or IP CIDR range was queried and domain(s) were returned.
The response direction often yields fewer or no records This is because in DNS A records, domain is the query and the IP address is the response. If you enter a domain with the toggle set to response, or an IP address with the toggle set to query, if no results appear, try flipping the toggle and re-running the search.
Send Results to Pivot Engine
Send pDNS results to the Pivot Engine by selecting Send domain results to pivot engine. You can modify or restart your search with pivots.
IP Profile Data Panel
IP Profile is analogous to the Domain Profile panel. It provides key datapoints as well as the raw Whois record for the IP address. Pivot on the IP itself in order to modify or begin a search on that address.
In most places where an IP address is displayed across Iris Investigate, a magnifying glass icon appears just to the right of the address. Selecting the icon will bring up the IP Inspect view, which is a fast way to view the IP Profile and IP Tools data for an IP address without losing your place in the UX.
IP Tools Data Panel
The IP Tools panel provides three tools to investigate IP address information:
- Ping generally tells you whether the IP address is reachable. When you trigger a ping through the interface, the ping originates from DomainTools and includes no record of your involvement.
- Traceroute gives insights into the hosting, routing, and reachability of the IP address. As with Ping, when you trigger a traceroute through the interface, it originates from DomainTools and includes no record of your involvement.
- PTR, the DNS Pointer (PTR) record, is commonly used as a form of Reverse DNS lookup. It shows the CNAME of the IP address, which tells you about the actual owner of the address (often a hosting provider) but not necessarily about the domains that may be hosted on that address.
SSL Profile Data Panel
The SSL Profile panel provides SSL certificate details, including additional potential pivots. When DomainTools finds more than one certificate on a domain, Iris Investigate shows the certificates in separate tabs.
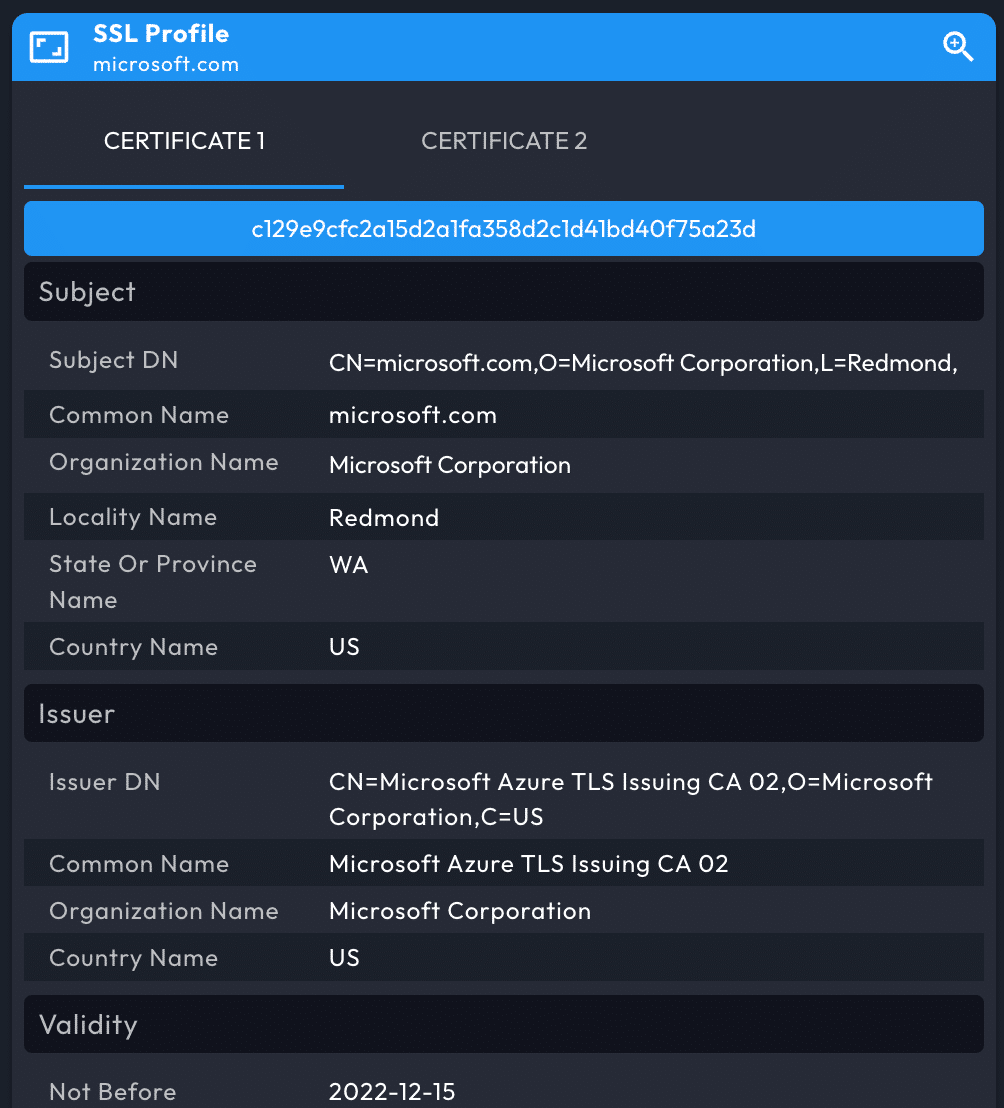
The additional pivots from an SSL/TLS certificate are found in the Extensions -> Subject Alt Name section, from which you can open the Operations Menu. To examine all the domains covered by a certificate, use the ADD TO FILTERS button.

Whois History Data Panel
The Whois History Data Panel shows, by default, the current Whois record for the domain, with a vertical timeline of earlier dates for which DomainTools has a historical Whois record.
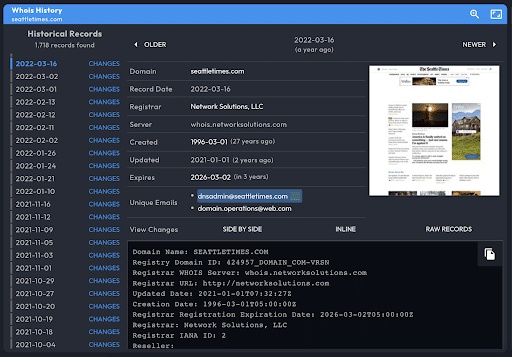
View changes to Whois records with three methods: Side by Side and Inline highlight the differing rows in the Whois record. Raw records show the two records together.
Unique emails are listed for pivoting with the Operations Menu.
Settings
The Settings panel is located within the Product Menu.
Pivot Engine Settings
Guided Pivots Settings
Configure guided pivot ranges for each available data type.
Historical Search Settings
In addition to current records, Iris Investigate can find historical records matching email address and registrant information queries. Specifically, the three query types supported are email address, registrant, and Whois record contains. By default, historical search is enabled.
Per-search override: on an individual search, enable or disable historical queries on the three supported fields. To override, open Advanced search, select the history icon, and re-run your query.
Historical searching can return domains that do not match your query. The reason for this is that at some time in the domain’s history, it did match the query. To see the record(s) where the domain matched the query, select See Historical Matches. This opens Whois History to the most recent record that matched your search term.
Active and Inactive Domains: Iris Investigate will indicate when a domain is inactive with an icon near the domain name in Pivot Engine, and in the Status column. To be marked inactive, the domain must no longer resolve in DNS. Because there can be unusual cases in which registered domains do not resolve, or where unregistered domains do resolve, both conditions (not registered, not delegated) must be true for the domain to be marked inactive.
Reference
Search Parameters, Inputs, Operators, and Shortcodes
FieldHistorical ToggleShortcodeOptionsAdsense-adDoes Not MatchExistsMatchesBaidu Analytics--Does Not MatchExistsDoes Not ExistMatchesContact Country Code-cons.ccBegins WithDoes Not MatchExistsMatchesContact Name-cons.nmBegins WithContainsContains AllDoes Not ContainDoes Not Contain AllDoes Not Exactly MatchExactly MatchesExistsContact Phone-cons.phBegins WithDoes Not MatchExistsMatchesContact Street-cons.strBegins WithContainsContains AllDoes Not ContainDoes Not Contain AllDoes Not Exactly MatchExactly MatchesExistsCreate Date-creDoes Not MatchGreater ThanGreater Than or Equal ToLess ThanLess Than or Equal ToMatchesWithinDomain-domainBegins WithContainsDoes Not ContainDoes Not MatchEnds WithExistsInMatchesNot InEmailYesemBegins WithDoes Not MatchExistsInMatchesNot InEmail - Admin-empaBegins WithDoes Not MatchExistsMatchesEmail - Billing-empbBegins WithDoes Not MatchExistsMatchesEmail - DNS/SOA-emaBegins WithDoes Not MatchExistsMatchesEmail - Registrant-emprBegins WithDoes Not MatchExistsMatchesEmail - Technical-emptBegins WithDoes Not MatchExistsMatchesEmail - Whois-emwBegins WithDoes Not MatchExistsMatchesEmail Domain-emdBegins WithDoes Not MatchExistsInMatchesNot InExpiration Date-expGreater ThanGreater Than or Equal ToLess ThanLess Than or Equal ToMatchesWithinFacebook (Meta Pixel)--Does Not MatchExistsDoes Not ExistMatchesFirst Seen-current_lifecycle_first_seenGreater ThanGreater Than or Equal ToLess ThanLess Than or Equal ToMatchesWithinGoogle Analytics-gaDoes Not MatchExistsDoes Not ExistMatchesGoogle Analytics 4--Does Not MatchExistsDoes Not ExistMatchesGoogle Tag Manager--Does Not MatchExistsDoes Not ExistMatchesHotjar--Does Not MatchExistsDoes Not ExistMatchesIP-ip.ipDoes Not MatchGreater ThanGreater Than or Equal ToInLess ThanLess Than or Equal ToMatchesNot InIP ASN-ip.asnDoes Not MatchGreater ThanGreater Than or Equal ToLess ThanLess Than or Equal ToMatchesIP Country Code-ip.ccBegins WithDoes Not MatchExistsMatchesISP IP Information-ip.ispContainsContains AllDoes Not ContainDoes Not Contain AllDoes Not Exactly MatchExactly MatchesExistsMX Server-mx.mxBegins WithDoes Not MatchExistsMatchesMX Server Domain-mx.mxdBegins WithDoes Not MatchExistsMatchesMX Server IP-mx.mipDoes Not MatchGreater ThanGreater Than or Equal ToInLess ThanLess Than or Equal ToMatchesNot InMatomo--Does Not MatchExistsDoes Not ExistMatchesName Server-ns.nsDoes Not MatchExistsMatchesName Server Domain-ns.nsdBegins WithDoes Not MatchExistsMatchesName Server IP-ns.nipDoes Not MatchGreater ThanGreater Than or Equal ToInLess ThanLess Than or Equal ToMatchesNot InRank-popularity_rankDoes Not MatchGreater ThanGreater Than or Equal ToLess ThanLess Than or Equal ToMatchesRedirect Domain-rddBegins WithDoes Not MatchExistsMatchesRegistrantYesr_nBegins WithContainsContains AllDoes Not ContainDoes Not Contain AllDoes Not Exactly MatchDoes Not MatchExactly MatchesExistsMatchesRegistrant Organisation-r_oBegins WithContainsContains AllDoes Not ContainDoes Not Contain AllDoes Not Exactly MatchDoes Not MatchExactly MatchesExistsMatchesRegistrar-regBegins WithContainsContains AllDoes Not ContainDoes Not Contain AllDoes Not Exactly MatchDoes Not MatchExactly MatchesExistsMatchesRisk Score-crDoes Not MatchGreater ThanGreater Than or Equal ToLess ThanLess Than or Equal ToMatchesSSL Alt Names-ssl.alt_namesBegins WithContainsDoes Not ContainDoes Not MatchExistsMatchesSSL Duration (days)-ssl.durationDoes Not MatchGreater ThanGreater Than or Equal ToLess ThanLess Than or Equal ToMatchesSSL Email-ssl.emBegins WithDoes Not MatchExistsMatchesSSL Hash-ssl.shBegins WithDoes Not MatchExistsMatchesSSL Issuer Common Name-ssl.issuer_common_nameBegins WithContainsDoes Not ContainDoes Not MatchEnds WithMatchesSSL Not After Date-ssl.not_afterDoes Not MatchGreater ThanGreater Than or Equal ToLess ThanLess Than or Equal ToMatchesWithinSSL Not Before Date-ssl.not_beforeDoes Not MatchGreater ThanGreater Than or Equal ToLess ThanLess Than or Equal ToMatchesWithinSSL Subject-ssl.sBegins WithDoes Not MatchExistsMatchesSSL Subject Common Name-ssl.common_nameBegins WithContainsDoes Not ContainDoes Not MatchEnds WithMatchesSSL Subject Org Name-ssl.soBegins WithContainsContains AllDoes Not ContainDoes Not Contain AllDoes Not Exactly MatchDoes Not MatchExactly MatchesExistsMatchesServer Type-server_typeBegins WithContainsContains AllDoes Not ContainDoes Not Contain AllDoes Not Exactly MatchDoes Not MatchExactly MatchesExistsMatchesStatcounter - Project Codes--Does Not MatchExistsDoes Not ExistMatchesStatcounter - Security Codes--Does Not MatchExistsDoes Not ExistMatchesStatus-activeMatchesTLD-tldBegins WithDoes Not MatchExistsInMatchesNot InTags-tagsContainsContains AllDoes Not ContainDoes Not Contain AllWebsite Title-titleBegins WithContainsContains AllDoes Not ContainDoes Not Contain AllDoes Not Exactly MatchDoes Not MatchExactly MatchesExistsMatchesWhois RecordYeswhoisContainsContains AllYandex Metrica--Does Not MatchExistsDoes Not ExistMatches
Match Operations Available in Advanced Search
- Begins With
- Matches
- Exactly Matches (case sensitive)
- Does Not Match
- Does Not Exactly Match (case insensitive)
- Contains (matches if any term in the query is found)
- Contains All
- Does Not Contain
- Does Not Contain All
- Ends With
- Greater Than
- Greater Than or Equal To
- Matches (“Equal To” for quantitative fields)
- Equal To or Less Than
- Less Than
- Exactly
Pivot Engine Table Columns (Fields)
By default, the table includes all fields:
- Domain
- Status (active or inactive)
- Tags
- Domain Lifecycle First Seen (when DomainTools first became aware of the current Domain Lifecycle)
- Domain Risk Score
- Email (registrant email)
- Email domain
- Contact Information (registrant, admin, tech, billing, SOA, etc.)
- Registrant
- Registrant Organization
- Registrar
- Registrar Status
- Create Date
- Expiration Date
- Name Server
- IP (Address, ISP, ASN, Country)
- Trackers – the following web trackers are gathered with screenshots:
- Google Adsense
- Google Universal Analytics
- Google Analytics 4
- Google Tag Manager
- Baidu
- Hotjar
- Matomo
- Statcounter
- Yandex
- Rank
- Website Response
- Website Title
- Server Type
- Redirect
- Redirect Domain
- MX (Mail Exchanger) Information
- SSL certificate Hash (the
sha1digest of theDERencoding of the certificate) - SSL certificate Organization
- SSL certificate Subject Alt Names
- SSL Certificate Issuer
- TLD (to enable sorting/filtering by TLD in large result sets)
Appendix: Tutorials
Guided Search
Guided search inputs (detailed above) are accepted in the Iris Investigate search area, and by passing the guided search parameters to Iris Investigate via a URL. Guided search parameters and accepted operators are specified in this appendix below.
For example, searching Iris Investigate for 209242 to locate domains on the Autonomous System Number (ASN) ASN209242 will return results for the string 209242, including user accounts and email addresses.
However, the search string ip.asn:"209242" will instruct Iris Investigate to search only ASNs.
These two searches can also be accomplished with a URL query parameter. A generic search for 209242 is constructed as:
https://iris.domaintools.com/investigate/search/?q="209242"
A guided search for ASN209242, however, is written as:
https://iris.domaintools.com/investigate/search/?q=ip.asn:"209242"