Farsight's DNSDB Plugin for Splunk


1. Introduction
Splunk is a very popular log management tool, terrific for digging into syslogdata and similar data sources.
Splunk also represents another potential interface to Farsight Security’s DNSDBwhile also providing a convenient way for analysts to easily/automaticallyenhance data managed by Splunk.
2. What We’re Going To Cover Today
Because this is a longer blog post than many, we’ll begin by outlining whatwe’re going to cover, major chunk by major chunk:
- Installing the trial version of Splunk Enterprise
- Installing the Farsight Security DNSDB plugin For Splunk
- Using the plugin to do some ad hoc queries
- Loading some sample syslog data
- Extracting a variable of interest from that syslog data
- Enhancing that variable by automatically looking up its values in DNSDB
- Making Splunk queries against that DNSDB-enhanced data
That’s quite a program of work, but you’ll be surprised at how quickly thosetasks go once you actually try them!
3. Installing the Trial Version of Splunk Enterprise
Multiple versions of Splunk are available, including a free version, and trialversions of the Enterprise and Cloud versions.
The Farsight Splunk plugin MUST be used with the Enterprise version ofSplunk. Click here to get a free 60 day trial of Splunk Enterprise (registration required, and the trial version of Splunk Enterprise is limited to indexing 500MB of data per day).
Note that you can even install and run the trial version of Enterprise Splunk on a Mac laptop, so that’s what we’ll use for the demos we’ll do in this blog post.
Installation of the trial version of Splunk Enterprise on a Mac is pretty typically Mac-like/straightforward — just double click on the installer. See Image 1:
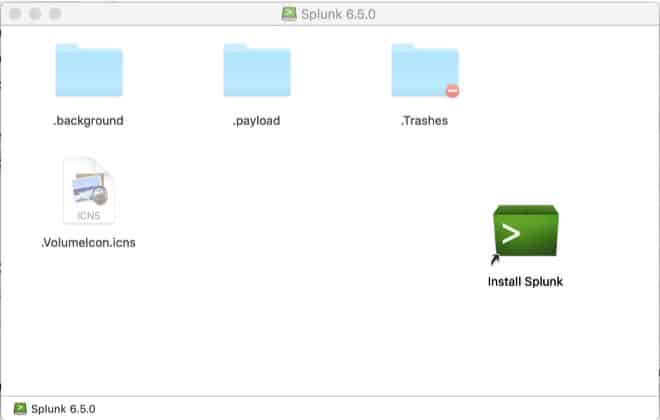
Image 1.
Splunk is not particular svelte (to say nothing of all the data you’ll also probably load). Disk usage for a basic “standard install” of Splunk itself can be seen in Image 2:
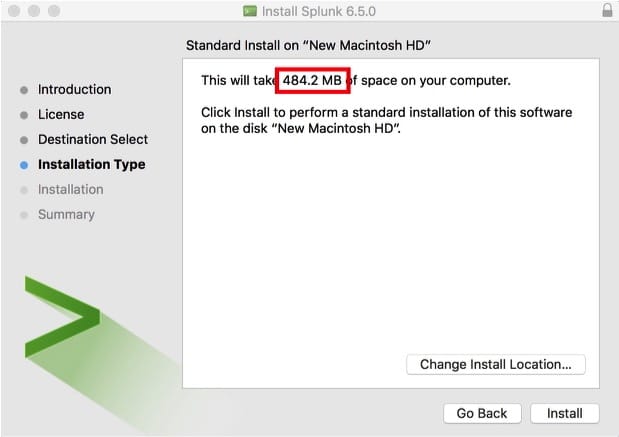
Image 2.
Once you’ve got Splunk installed, you can launch it from your desktop by double clicking on the Splunk app icon. You should then see the Splunk Helper window appear, see Image 3:
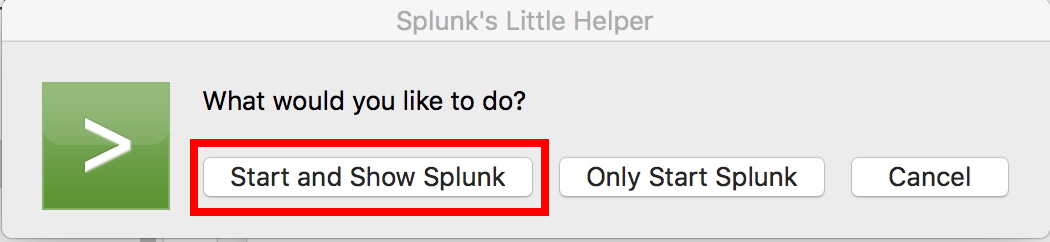
Image 3.
Click “Start and Show Splunk.”
You should then see something like Image 4 in your web browser:
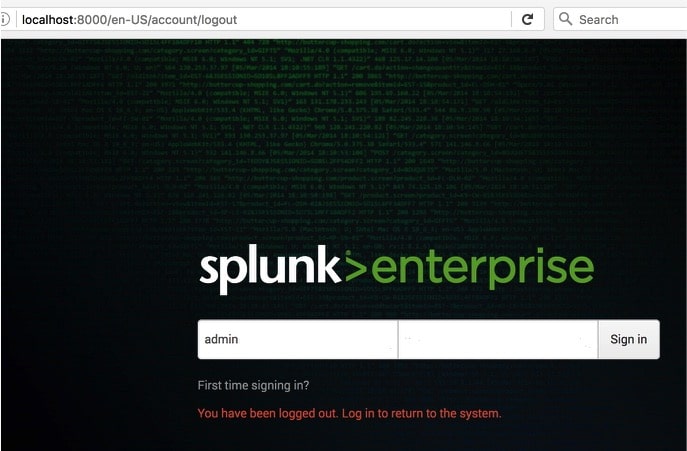
Image 4.
Login as admin. [Note the “First time signing in?” link if this is your first time logging in.]
4. Getting The Farsight Security DNSDB Plugin For Splunk
You’re now ready to get and install the DNSDB plugin. To get the plugin, use your web browser to visit:
- https://www.farsightsecurity.com/solutions/farsight-dnsdb-for-splunk/
- https://splunkbase.splunk.com/app/3050/
After you’ve downloaded the Farsight DNSDB plugin for Splunk, you’ll see:
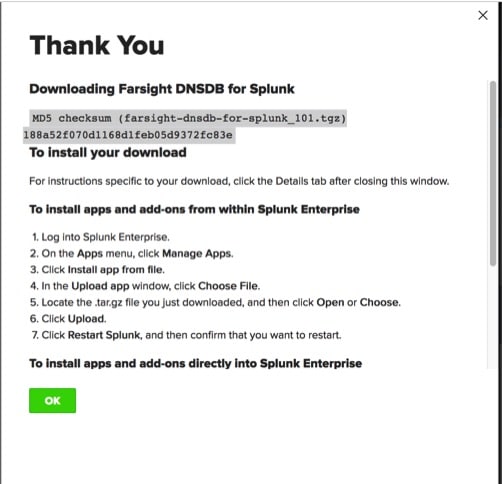
Image 5.
It’s always good to confirm the integrity of any downloads, including theFarsight Splunk plugin. On the Mac, the MD5 checksum program is available at/sbin/md5. Use it to verify the checksum of the archive file you downloaded by saying:
$ /sbin/md5 farsight-dnsdb-for-splunk_101.tgz
You should see:
MD5 (farsight-dnsdb-for-splunk_101.tgz) = 188a52f070d1168d1feb05d9372fc83e
The quoted checksum we saw matches the highlighted value on the welcome message shown above, so we’re good to proceed with the installation.
5. Installing the Farsight DNSDB Splunk Plugin
To install the Splunk plugin, follow the steps shown in Image 5, above:
- Login into Splunk Enterprise
- On the Apps menu, click Manage Apps
- Click Install app from file
- In the Upload app window, click Choose File
- Local the .tar.gz file you downloaded (on the Mac, this will typically be in the ~/Downloads folder), and then click Open or Choose
- Click Upload
- Click Restart Splunk, and then confirm that you want to restart.
6. Getting the Documentation for the Farsight DNSDB Plugin for Splunk
Documentation for the plugin is available here.
That User’s Guide should be considered “must-have” piece of documentation forall Splunk users who want to use the Farsight DNSDB Plugin with Splunk!
7. API Key For Access to DNSDB
You’ll also need a Farsight DNSDB API key in order to actually be able to use the DNSDB plugin for Splunk.
Your regular DNSDB API key, if you already have one, will work fine for this purpose.
If you don’t already have a DNSDB API key, please contact Farsight Security Sales (contact information at the bottom of this article).
If you need to configure or reconfigure your DNSDB API key in the DNSDB Plugin for Splunk, you can do so in Splunk by clicking on the little blue “gear” icon in the upper left hand corner of the Splunk dashboard. See Image 6.
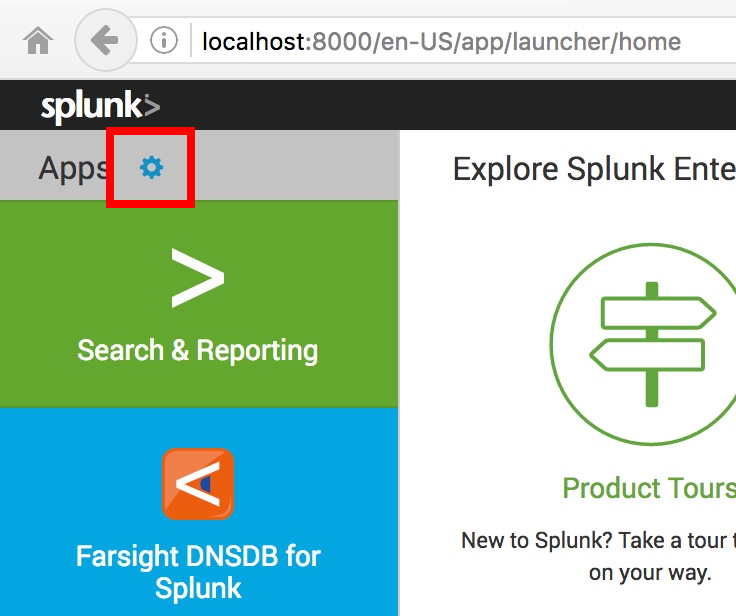
Image 6.
After you’ve clicked on the little blue gear icon, you’ll then see a list of Apps, including Farsight DNSDB for Splunk.
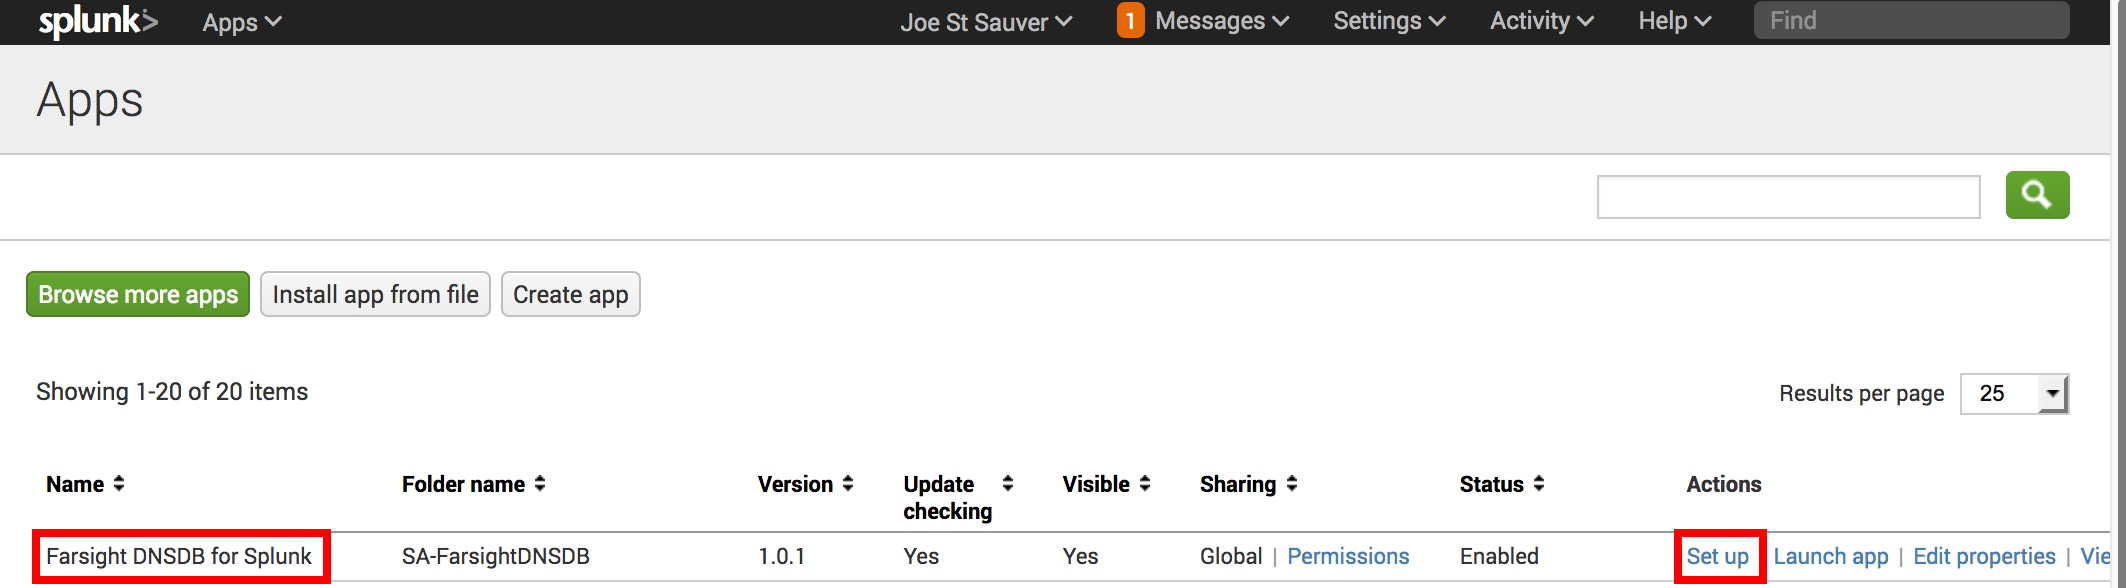
Image 7.
Click on setup, as highlighted in Image 7.
Enter your DNSDB API key, and make sure that the API URI is set to point to:
https://api.dnsdb.info
[unless you’re running DNSDB Export. If you’re running DNSDB Export, point the API URI at your local/on-premises DNSDB server instance URI, instead]
Click Save.
8. The Splunk DNSDB Ad Hoc Query Interface In Action
To work with the Splunk DNSDB Ad Hoc Query Interface, click on the new Farsight DNSDB for Splunk icon that should now be in the left column of your default Splunk window, see Image 8:
Image 8.
After double clicking on the icon, you’ll then see the Ad Hoc Query Interface. Image 9 shows partial results returned for a sample query for
www.cornell.edu
:
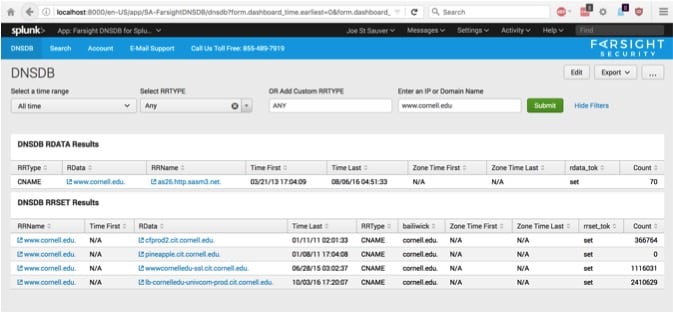
d
Image 9.
9. Automated Use of the Farsight DNSDB Plugin to Enhance Datasets in Splunk
While you can certainly use the Farsight DNSDB Plugin for Splunk as just another web interface for making manual DNSDB queries, as we did in Section 8, above, the Splunk Plugin really shines when used as an automated way to enhance data that’s been loaded into Splunk.
Note Carefully: automatically enhancing large datasets may generate a large number of DNSDB queries. We recommend that you confirm your available quota before attempting to enhance a large dataset!
You can check your available quota from within Splunk by entering a vertical bar and the
DNSDBLIMIT
command, as shown in Image 10:
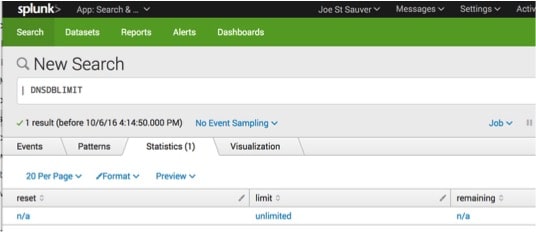
Image 10.
10. Loading Some Syslog Data Into Splunk
After you’ve checked your quota, you’re ready to load some data into Splunk.
We’ll illustrate the process of enhancing a Splunk dataset by investigating syslog entries associated with rejected connections.
This involves four steps beyond installing Splunk Enterprise and the Farsight DNSDB Plugin for Splunk:
- We begin by illustrating the one-time importation of syslog data
- Then we extract the connecting IP address field from the syslog data
- Next, we automatically enhance the IP addresses with hostnames
- Finally, we show creation of a summary table showing the hostnames of the IPs we’ve blocked when they attempted to connect.
This process takes longer to describe than to do, once you’re familiar with it.
Begin by clicking on “Add Data,” see Image 11.

Image 11.
Then we select “Upload,” see Image 12.
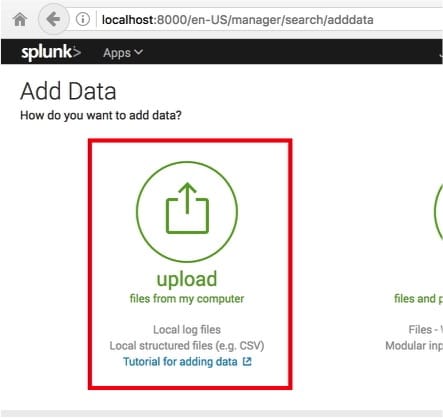
Image 12.
We’re then ready to select the file we want to upload, and click the green Next button in the upper right. See Image 13.
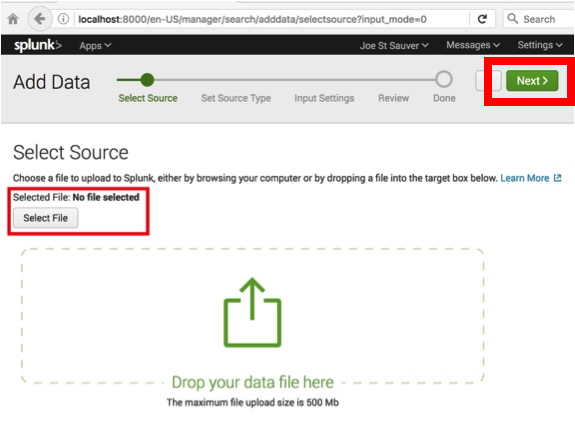
Image 13.
Next, we’ll tell Splunk what sort of data file we’re injesting (it’s a syslog file from a BSD server where that file is called “messages”).
If you’re hoping to replicate this example just using your Mac, your current syslog file will typically be located at
/var/log/system.log
. See Image 14.
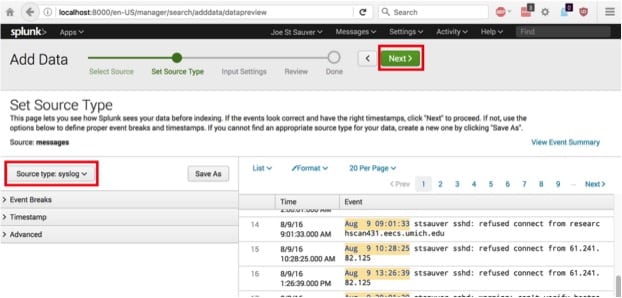
Image 14.
Our next chore is to tell Splunk what host this data’s from. For this example, the log file came from a host that tags its syslog entries with the literal string “stsauver” so that’s what we’ll put in for the “Host field value.” Your host will need some other value. See Image 15.
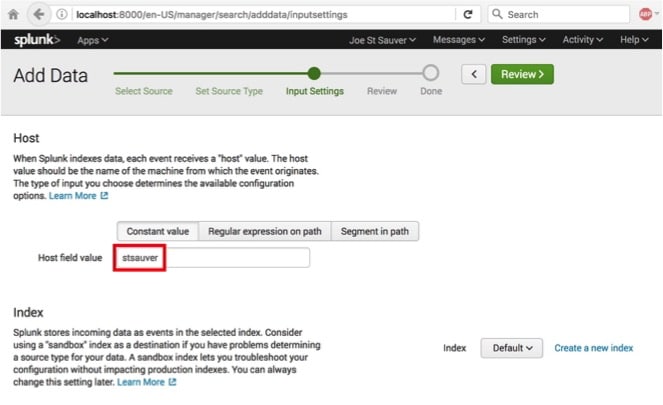
Image 15.
We’re now ready to review the settings we’ve supplied. If everything looks good, just click the green Submit button. See Image 16.

Image 16.
Splunk will then confirm that the syslog records have been successfully uploaded. You’re then ready to extract a field. See Image 17.
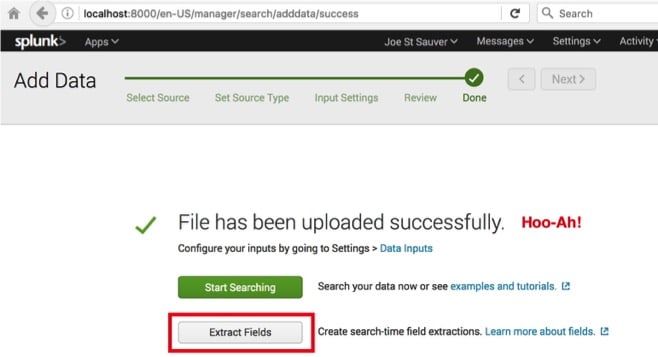
Image 17.
11. Extracting a Field From The Syslog Data
Sometimes the field we want to work with in Splunk may be automatically available. Other times we need to help Splunk find and extract the relevant data.
As part of the field extraction process, we confirm the type of file, and scroll down and select a relevant sample event from the file. See Image 18.
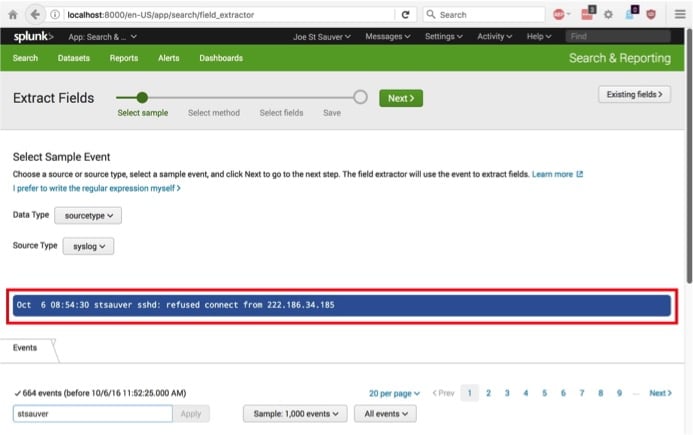
Image 18.
In Image 19, we tell Splunk to use a Regular Expression to extract the field of interest:

Image 19.
In Image 20, we select the field we want Splunk to extract, and give it a name. In this case, we pick the IP address of a host we didn’t allow to connect, and called it“connecting_ip.” Click the green Next button when you’re ready.
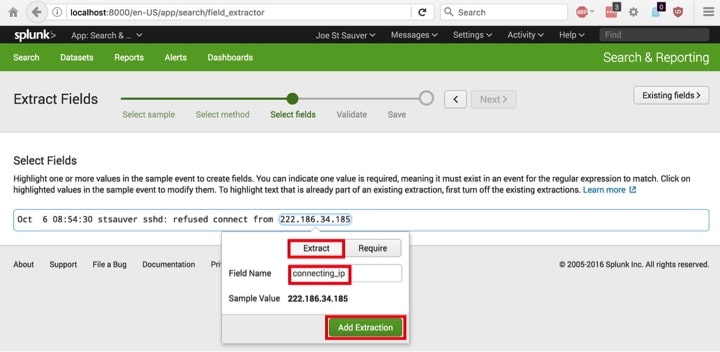
Image 20.
The validate screen gives you a chance to confirm that Splunk is picking things up the way it should. If it is, click the green Next button when you’re ready.
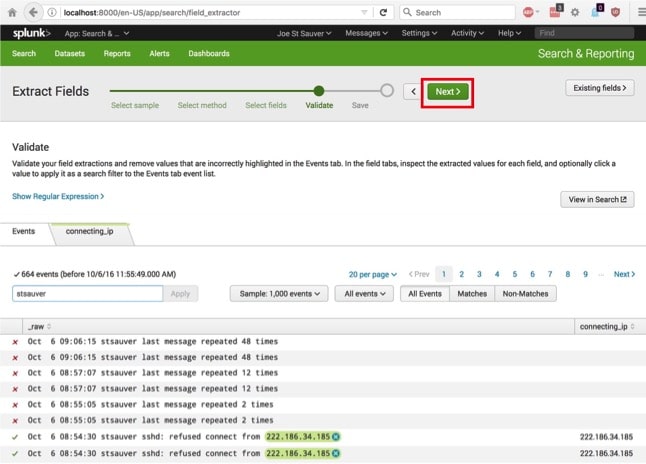
Image 21.
Confirm the “Extract Fields” process by clicking on the green Finish button. See Image 22.
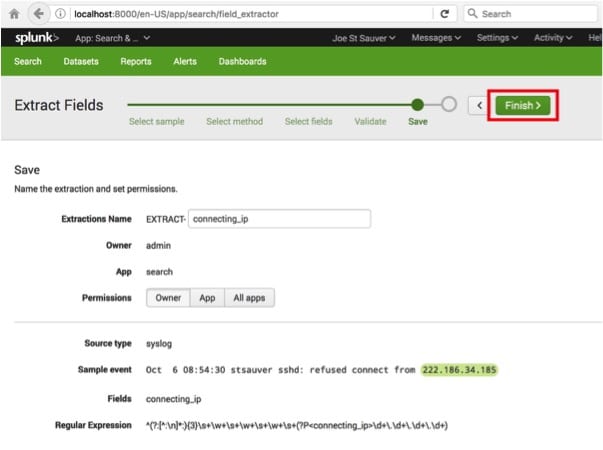
Image 22.
12. Automation Time! Now Things Start to Get Fun!
We’re now ready to tell Splunk to automatically look up those IPs. As shown in Image 23, we select Settings –> Lookups.
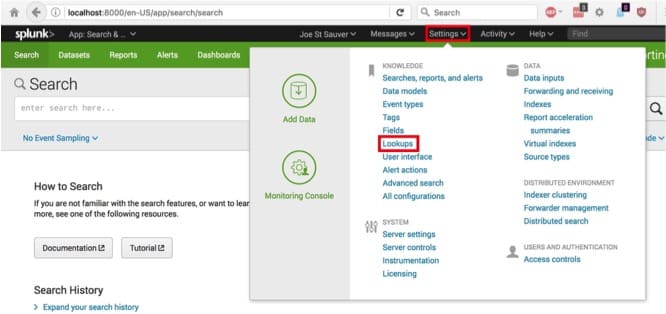
Image 23.
We then tell Splunk to add a new Automatic Lookup. See Image 24.
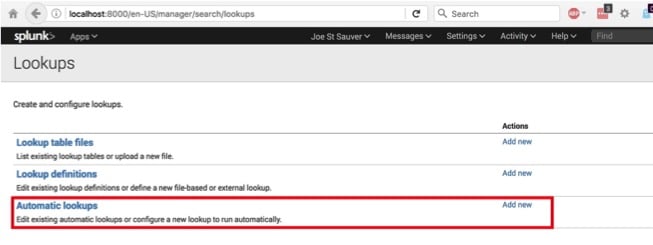
Image 24.
As shown in Image 25, we select Search & Reporting, and then click the green “New” button:

Image 25.
On the Add new screen (see Image 26):
- we confirm that the destination app is “search”,
- we give the automatic lookup a name (“ClientIP – DNSDB lookup” works as well as anything),
- we point the automatic lookerupper at the dnsdb table,
- we apply the automatic lookup rule to sourcetype=syslog records,
- we map the IP address input field from the dataset
(called “dnsdb_ip”), see the DNSDB Splunk user guide at PDF page 13)
to the new variable name “connecting_ip” - we map the output field from the DNSDB plugin
(called “dnsdb_host”, see the DNSDB Splunk user guide at PDF page 13)
to the new variable name “connecting_ip_hostname”
We then click the green “Save” button. See Image 26:
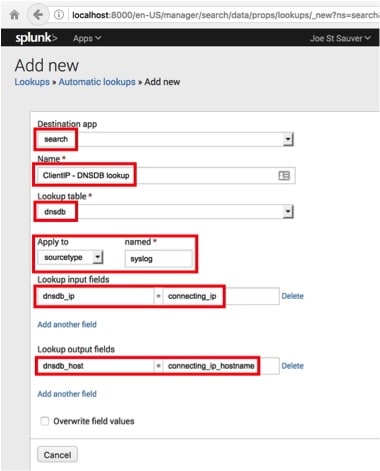
Image 26.
At this point the automatic DNSDB lookerupper should be enabled (e.g., running). See Image 27.
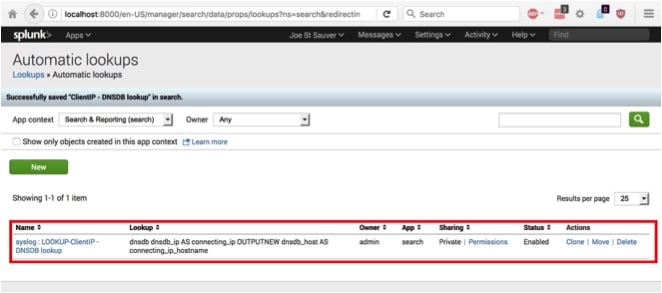
Image 27.
13. Now Let’s Try A Query!
Let’s search for records that contain two strings:
- “stsauver” (the name of our syslogging host)
- “refused” (the status that applies to blocked connections)
We can see matching records of this sort in Image 28:
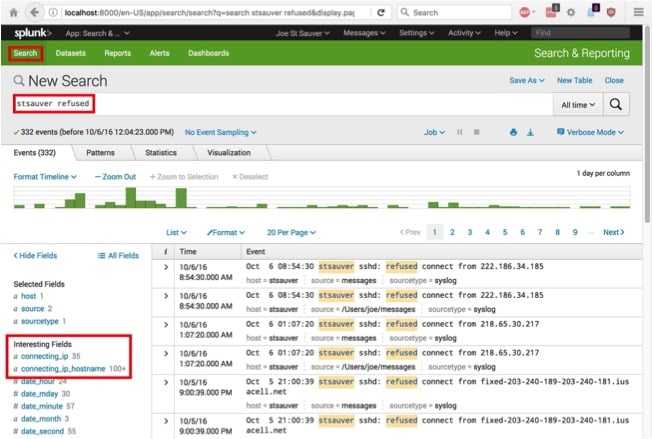
Image 28.
In Image 29, we take a quick look at the IP addresses that were refused on that host:
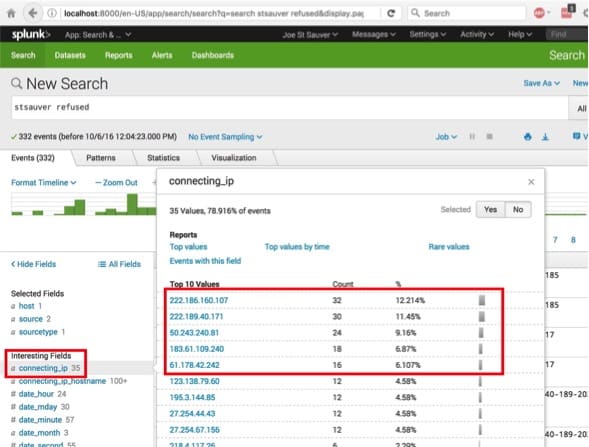
Image 29.
In Image 30, we select the connecting_ip_hostname variable instead. These are the values that were automatically looked up in DNSDB, the point of the whole exercise.
Obviously, the more unique IP addresses, the more valuable this sort of automation becomes.
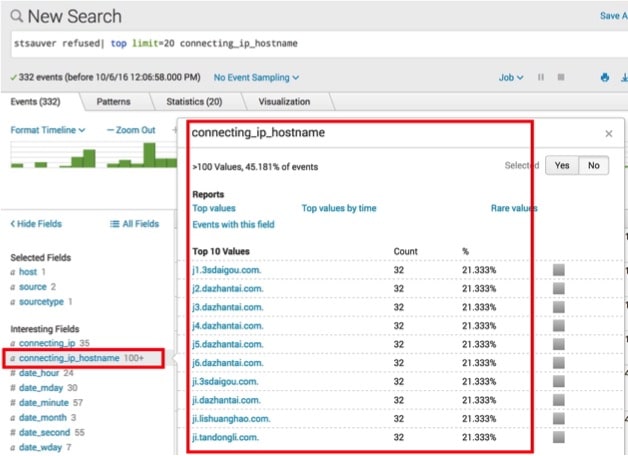
Image 30.
14. Conclusion
Congratulations on making it all the way to the end of this blog post — we know it’s been a long one! Obviously you don’t need to go through all this rigamarole every time, you’ll just need to do it ONCE.
Moreover, when you actually try the process, you’ll be surprised at how little time it actually takes, and how convenient the Farsight DNSDB Plugin for Splunk can be once you’ve got it set up.
Some homework (if you choose to accept it!): why don’t you try loading some data of your own into Splunk?
When doing so, rather than just extracting IP addresses the way I did, maybe try extracting and enhancing fully qualified domain names, instead? As noted on PDF page 13, section 4. of the DNSDB Splunk user guide the lookup input field name in that case would be “dnsdb_host”
Finally, if you want to obtain a non-temporary DNSDB API key, or you need to increase the number of DNSDB queries you can do per day for an existing DNSDB API key, please see our ordering page.
Thanks for checking out the Farsight Security DNSDB Plugin for Splunk!
Joe St Sauver, Ph.D., is a Scientist with Farsight Security, Inc.